Showing posts with label Vehicles. Show all posts

Saturday, October 26, 2013

Headlight Restoration Kit: Rain-X vs Turtle Wax

Headlight Restoration Kits


Turtle Wax and Rain-X Headlight Restoration Kits
Headlight Restoration Kits
Image Source: Dr. Penny Pincher

A common problem for older cars is that the headlights become oxidized start to turn a yellowish color.  This not only looks bad, but reduces the ability for the headlights to provide adequate light to see well for night driving.

Not to worry, you can buy headlight restoration kits to solve this problem.  If you believe the advertisements, you just apply some chemicals to your faded old headlights, wipe it off, and they look like new.  Do headlight restoration kits really work?  Is it hard to make old yellowed headlights look new again?

What is in a Headlight Restoration Kit?

Headlight restoration kits can be purchased for about $10 to about $30 and contain cleaning chemicals and abrasive pads.  The kit by 3M contains a special abrasive pad that you use with a power drill.  Some kits also contain a sealer to help keep your headlights from yellowing again after you clean them.


How long does it take to Restore Headlights?

It takes 30 minutes to 1 hour to restore two headlights.  The amount of time it takes depends on how much scrubbing you want to do to make your headlight lens look clear again.  Heavily corroded headlight lenses take quite a bit of work with the abrasive pads to make them look clear again.  I would say it is about as much work as applying a coat of wax by hand to a car.


Do Headlight Restoration Kits Work?

I have tried two headlight restoration kits- Rain-X Headlight Restoration Kit and Turtle Wax Lens Restorer.  Both of these kits improved the appearance of my headlight lenses and made it easier to see at night.  It is not quite as easy to restore headlights as the advertisements would have you believe, however.  It takes some effort to scrub the headlights using the abrasive pads and cleaning chemicals to clean the oxidation off of the surface of the headlight.

Which is the Best Headlight Restoration Kit: Rain-X vs Turtle Wax

Both Rain-X and Turtle Wax headlight restoration kits made my headlights look better.  Both kits contain similar cleaning chemicals and abrasive pads.

Turtle Wax Headlight Lens Restorer Kit Contents:

  • Lens Clarifying Compound (4 fl oz)
  • Spray Lubricant (4 fl oz)
  • Lens Sealing Wipe
  • Restoration Pads: Green (level 1), Brown (level 2), 2-sided Purple (level 3/level 4)


Rain-X Headlight Restoration Kit Contents:

  • Rain-X Lubricant (2 fl oz)
  • Rain-X Headlight Restorer (5 fl oz)
  • Rain-X Sealant (2 fl oz)
  • Polishing Pads- 3
  • Microfiber cloth

Overall, I prefer the Rain-X headlight restoration kit over the Turtle Wax kit.  The Turtle Wax kit has only one sealing wipe, so you can only use the kit once if you want to be able to seal the headlight when you are finished cleaning it.  The Rain-X kit has a bottle of sealant spray, so you it is easier to reuse the kit on additional cars, or to clean your headlights more in the future as needed.


Copyright © 2013 Dr. Penny Pincher.  All Rights Reserved.  Privacy Policy

Turtle Wax Black Box- Best Wax For Black Cars?

Turtle Wax Black Box


Shows everything that comes in the Turtle Wax Black Box Kit
Turtle Wax Black Box
Image Source: Dr. Penny Pincher

I have waxed cars with Turtle Wax, Carnauba wax, and synthetic wax.  I recently got a used black car and wanted to wax it before winter.  The car is about 10 years old and has some scratches and rock chips.  I was concerned about using any kind of wax that turns white when it dries- this would only highlight rock chips and scratches on a black vehicle.

The black paint finish is a bit faded and not as deep black as a newer car, which is not unexpected for a 10 year old car.  I asked at AutoZone if they made wax for black cars- they recommended the Turtle Wax Black Box Kit.  The kit contains a Step 1 wax cleaner and conditioner (12 oz), black tinted detailing spray (two 12 oz bottles), and Step 2 deep black carnauba  wax (12 oz).  The kit also contains 2 small foam pads for applying the Step 1 and Step 2 products.  Not included in the kit are two microfiber clothes that the instructions say to use to remove the wax cleaner/conditioner and to remove the wax.


How to Apply Turtle Wax Black Box Products

The instructions on the box mention that it may take 2-3 hours to wax a sedan.  This seemed like a pretty big commitment, but I was willing to give it a try.  As with any wax, you need to wash your car before applying the wax. Since all of the products in the Black Box are tinted black, you need to apply it carefully to avoid getting it on any trim, badges, lights, stickers, etc. that are not black.  You may want to wear gloves as well- my hands looked like I had been polishing black shoes all afternoon by the time I was finished applying the Turtle Wax Black Box.  It took me about two hours total for a medium size car.

The Step 1 conditioner seems like black tinted wax to me.  It is fairly thick stuff and did take some time to put on.  It formed a haze within a few minutes.  You then spray a small amount of detailing spray on the hazed conditioner/cleaner and remove it with a microfiber cloth.

Next is Step 2- the deep black wax.  This was very thin- in fact I spilled a bit of wax since it came out of the bottle so fast.  I had never used a wax this thin before.  It went on very easily and also was removed easily using a microfiber cloth and some detailing spray.  Did I mention that you might want to wear gloves when using the Black Box?  Your microfiber clothes will also be black when you are done waxing.


Turtle Wax Black Box- Best Wax For Black Cars?

I would say that the car finish looked better after applying the black wax.  The result was not as dramatic as the example of the faded finish turned to a deep black finish that was shown on the box, but certainly improved.  The black tint did seem to fill in small scratches with black so that they are less noticeable.  There were a couple rock chips on the roof (not sure how that happened) that were not really filled in with black color from the wax at all.  You'll need to use touch-up paint to address rock chips.

My main goal was to get a good coat of was on the car before winter without leaving ugly white wax residue.  The Turtle Wax Black Box certainly accomplished that and more.  The finish of the car looks to be a deeper black and is very shiny.  Compared with regular car wax, the black wax is messier to work with due to the black pigment, and the 2 step process is twice as much work as applying a single coat of wax.  Overall, I would say it is worth the trouble to use the Turtle Wax Black Box for a black car.


Copyright © 2013 Dr. Penny Pincher.  All Rights Reserved.  Privacy Policy

Check Engine Light Flashing- Can I Drive?

Check Engine Light Flashing- What Does it Mean?


Can You Drive With Check Engine Light Flashing?
Image Source: Dr. Penny Pincher

Normally when the check engine light comes on, it stays lit to indicate that a fault has been detected by your vehicle's On-Board Diagnostic System.  When a serious fault has been detected that could cause mechanical damage to your car if you drive it, the check engine light will flash.  The flashing check engine light is intended to get your attention and warn you that serious damage can occur if you drive your vehicle.

For example, the check engine light flashing could indicate that raw fuel is being passed through your engine due to serious misfiring in the engine.  This raw fuel can ignite and burn outside the cylinder and cause damage to your engine and catalytic converter- which is very expensive to repair.  Sensors in your engine detect misfiring and the On-Board Diagnostic computer determines whether to set the check engine light to solid or flashing based on how much damage could be caused by the misfiring.

If your check engine light is flashing, you should turn your engine off and call a tow truck to have your car checked by a mechanic.  Driving your vehicle with the check engine light flashing can result in serious mechanical damage.

Can I Drive With Check Engine Light Flashing?

It may be tempting to drive your vehicle to the shop to be checked out if it is running.  However, if the check engine light if flashing, it is not recommended to drive your vehicle.  Pull your vehicle to the side of the road or other nearby safe place to park it and call a tow truck.  Driving a vehicle with a flashing check engine light can result in expensive damage to your vehicle.


What is the Difference Between a Flashing Check Engine Light and a Solid Check Engine Light?

A solid check engine light indicates a fault has been detected by the On-Board Diagnostic system.  For example, this can be a fault with the evaporative emission control system that captures gasoline vapor and burns it in your engine.  There are many sensors in your engine, and many faults that can be indicated with the check engine light.  You can have a mechanic use a fault scanner to read the fault code.  The fault code will provide specific information about the cause of the check engine light in your vehicle.  You can also buy a check engine light fault code scanner for about $30.


A flashing check engine light indicates a serious problem that can cause damage if you drive the vehicle.  Only certain types of severe faults cause the check engine light to flash.  You should not drive a vehicle with a flashing check engine light- driving with a flashing check engine light may result in serious and expensive mechanical damage to your vehicle.


Recommended Reading:
How to Buy a Used Pickup Truck
How to Get the Best Deal on a Used Car


Copyright © 2013 Dr. Penny Pincher.  All Rights Reserved.  Privacy Policy

Thursday, October 24, 2013

Used Car Inspection: A Vehicle Inspection Can Save You Money

Used Car Inspection: Save Money Buying a Used Car!

Getting a mechanic to inspect a used car that you are considering purchasing is a bit of a pain.  You have to drive the car to a mechanic, the inspection may take an hour or so, and you have to pay $40 to $100 for a used vehicle inspection.  Is it worth the trouble?  On my last used car purchase, getting a vehicle inspection saved me thousands of dollars!

Get a Used Vehicle Inspection and Save Money!
Image Source: Dr. Penny Pincher

Why Get A Used Car Inspection?

Reason 1: A Used Car Inspection Helps You Avoid Purchasing a Used Vehicle that Requires Expensive Repairs

You get valuable information from a used car inspection.  I test drove a used car that I was interested in at a local used car lot.  It was a "low miles, one owner" special selling for $3650.  The brakes felt soft to me, so I decided to take it to a mechanic for inspection.  I found a nearby Midas shop that would do a used vehicle inspection for under $50.  It felt like a waste of money to spend $50 on a car that wasn't even mine, as well as spending a couple hours driving the car to the shop and having it inspected.  However, since I was thinking of spending several thousand dollars, I decided that spending $50 to find out more about the vehicle may be money well spent.  That turned out to be true.

The mechanic provided a report listing all of the items on the car that needed repair.  The total repair estimate: $4000!  Admittedly, some of the items on the estimate were not critical and did not urgently need repair.  However, the mechanic pointed out that it would take about $2000 of repairs just to make the car safe to drive.  It was an easy decision to pass on this used car and look for one in better shape.  And yes, the brakes were soft- the previous owner tried to put new brake pads on the car, but brake rotors were worn down, rusty, and needed to be replaced.  The brakes were actually unsafe!


Find out why the check engine light is on- read your own engine light fault codes with an OBD II Scanner.  Works on 1996 and newer vehicles- just plug it into your car.

Reason 2: A Used Car Inspection Gives You Bargaining Power to Get a Great Deal Buying a Used Car

I found another car I was interested in.  It was the same make and model as the $3650 special that I didn't buy after getting a vehicle inspection.  This one was one year newer and in much better condition.  It was priced a bit more at $4500, which was right at KBB book price for retail sale.  I actually found the car listed on craigslist for $4250- good thing I did some internet searching.  The dealer explained that he priced his vehicles a bit more aggressively on the internet than he did on his sticker prices.   I could handle spending a bit more for a used car if it would require less repairs.

I called the Midas shop to talk with them about bringing in another used vehicle for inspection.  It turned out that this shop has a policy that they will do a second vehicle inspection for free if you don't end up buying the first car you have inspected.  Great news!

This vehicle inspection turned out much better.  There was a total of about $2000 of repairs on the estimate, but some of these repairs were optional or could be put off for a long time.  The manager of the shop talked me through the recommended repairs and the priority of getting them done.  When I brought the car back to the car lot, I brought the repair estimate with me.  I ran through all of the repair items on the estimate with the car dealer.  The dealer was reassuring me that these repairs were not a big deal, and that his shop could actually do the repairs for less than Midas had estimated on the used vehicle inspection report.

When the time came to make an offer on the car, I circled about $1000 worth of repair items- the ones that the mechanic said were the highest priority.  I asked the dealer for his best price for the car with the circled repairs completed.  Since he had just explained that these repairs were not serious and that his shop could do the repairs cheaper than Midas, I felt like I was in a pretty good position to bargain.

The dealer went into his shop to talk with his mechanics for a few minutes.  He came back with his offer, which I accepted.  He would sell me the car for $4150 and complete the repairs I wanted included in that price.  Having a detailed used car inspection report gave me a great bargaining tool for buying a used car.


Recommended Reading:
How to Buy a Used Pickup Truck
How to Get the Best Deal on a Used Car


Copyright © 2013 Dr. Penny Pincher.  All Rights Reserved.  Privacy Policy

Sunday, March 24, 2013

Best RV: Motorhome or Travel Trailer?


What Type of Recreational Vehicle (RV) is Best?

Recreational Vehicles (RVs) are mobile living spaces that include beds, a bathroom, a kitchen, and other amenities of home.  These vehicles can be used for camping or even for long-term residences.  They can also be used as handy guest accommodations when you need extra bedrooms at your house.  If you're traveling to visit friends or family, you can bring your own bedroom if you want.

The two main types of recreational vehicles are motorhomes and travel trailers.  Motorhomes include a built-in vehicle with an engine, while travel trailers are towed by a pick-up truck.  The pros and cons of both types of recreational vehicles are presented.

Motorhomes

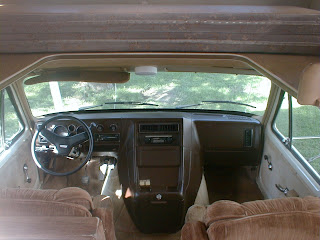
The most common motorhome types are Class C and Class A.  Class C motorhomes are based on a van style body, while Class A motorhomes are based on a bus style body.  Class A motorhomes look like a tour bus from the outside.  One nice feature of Class C motorhomes is the over cab bed- the space above the driving compartment converts to a large bed with a nice view.


24 foot class C motorhome
Class C Motorhome- 1986 Winnebago Minnie Winnie
Image Source: Dr. Penny Pincher

Driver and passenger seat, with bed over the top
Cab of a Class C Motorhome with bed over cab
Image Source: Dr. Penny Pincher
Both types of motorhomes may have slideouts to increase living space.  A slideout is a part of the motorhome that expands- or slides out- when the motorhome is parked to provide more living space.  Slideouts make a big difference in increasing the amount of room available which is especially useful if you are traveling with a large group.

Pros of Motorhomes vs Travel Trailers

  • You do not need to own a pickup truck which can cost $20K or more
  • You do not need to hitch/unhitch your recreational vehicle
  • Motorhomes are easier to drive and park than towing a travel trailer

Cons of Motorhomes vs Travel Trailers

  • After you reach your camping destination, you still need to drive the large vehicle (can't unhitch the house part)
  • Maintenance- you'll need to maintain both a vehicle and a house
  • Motorhomes generally cost more to purchase than a travel trailer of similar age and size


Travel Trailers

Travel trailers are recreational vehicles that are designed to be towed with a pickup truck.  The two main types are conventional and fifth-wheel.  Conventional trailers hitch to a pickup truck below the bumper of the truck, while fifth-wheel trailers hitch to the truck bed using an adapter.  Fifth-wheel trailers have a smaller turning radius than conventional trailers.  However you need to install a fifth-wheel adapter in your truck bed, and you'll need to remove the hitch adapter if you want to use your truck bed for other jobs.  Conventional trailers often use "sway bars" to help stabilize the trailer and keep it in line behind the tow vehicle.

Like motorhomes, travel trailers have slideouts available to increase floor space when the trailer is parked.


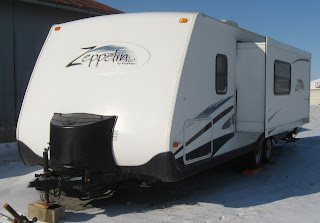
Travel trailer with hitch
Travel Trailer Hitch on 26 foot Zeppelin by Keystone
Image Source: Dr. Penny Pincher

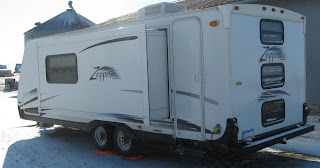
Travel trailer with slideout extended
Slideout on travel trailer- Zeppelin by Keystone
Image Source: Dr. Penny Pincher


Ball hitch on pickup truck
Ball hitch for conventional travel on pickup truck
Image Source: Dr. Penny Pincher


Close-up of trailer hitch
Conventional trailer has tongue that hitches to ball hitch on a pickup truck
Image Source: Dr. Penny Pincher


5th wheel trailer hitch
5th wheel hitch on 5th wheel travel trailer hitches to mechanism installed in bed of pickup truck
Image Source: Dr. Penny Pincher


the bed of a pickup with a 5th wheel hitch receiver and trailer hitched up
5th wheel trailer hitch receiver installs into the bed of a pickup truck
Image Source: Dr. Penny Pincher

Pros of Travel Trailers vs Motorhomes

  • You can unhitch your travel trailer when you arrive at your camping destination and drive your truck
  • Low maintenance- just torque the wheel nuts, grease, and winterize
  • Travel Trailer purchase price is usually less than a motorhome for similar age and size

Cons of Travel Trailers vs Motorhomes

  • You need to own a pickup truck to tow the trailer which can cost $20K or more
  • You will need to hitch/unhitch your recreational vehicle
  • Backing up a travel trailer is more difficult than backing up a motorhome


Truck Campers

Another option to consider is a truck camper.  This is a camper that slides into the bed of a pickup truck.  The amount of space inside a truck camper is limited since the camper is only about 14 feet long.  However this may be a convenient option for 1 or 2 people to use when traveling.  Truck campers can have bathrooms, showers, and kitchen facilities similar to travel trailers and motorhomes, but packed into a much smaller space.

With a truck camper, you get the advantages of a travel trailer over a motorhome.  You have a pickup truck to drive rather than driving a motorhome when you reach your destination.  Also, you do not need to deal with towing at all- the truck camper does not change the handling of the truck, and backing up with a truck camper is easy- backing up with a travel trailer takes some practice.  Some truck campers, like the shown below, have a bed over the cab of the pickup truck similar to a Class C motorhome.


Pickup truck with truck camper, side view
Image source: Dr. Penny Pincher


Pickup truck with truck camper, view from back
Image source: Dr. Penny Pincher


Small RVs

Class B motorhomes are van campers that are typically the size of a full-size van in length and may have a higher roof. Class B's are similar in size to a truck camper.  The smaller size of a van camper means that it is easier to drive and park at your destination.

Pop-up campers are towed behind a vehicle in a compact form, and then are assembled into full size at the campsite.  Assembly involves folding out tent sections from the main part of the camper.  Pop-up campers are lightweight and may be towed by a car or truck.


How to Decide?

  • If you already have a pickup truck, a travel trailer may be a better option than a motorhome
  • If you don't already have a pickup truck, a motorhome would require only a single purchase vs. purchasing both a travel trailer and a pickup truck
  • Get a book on motorhome and travel trailer repair and maintenance- this will let you know what to expect for each of these options so you can make the best choice
  • Consider smaller RV options such as truck campers, Class B motorhomes, and pop-up campers.  If you don't need a lot of space, these may be less expensive and easier to drive.
  • Look for deals on eBay:


Recommended reading:


Penny Pincher Journal
Copyright © 2013 Dr. Penny Pincher.  All Rights Reserved.  Privacy Policy

Thursday, February 21, 2013

Winter Driving Tips

Winter Driving Tips

How to Drive Safely in Winter Conditions


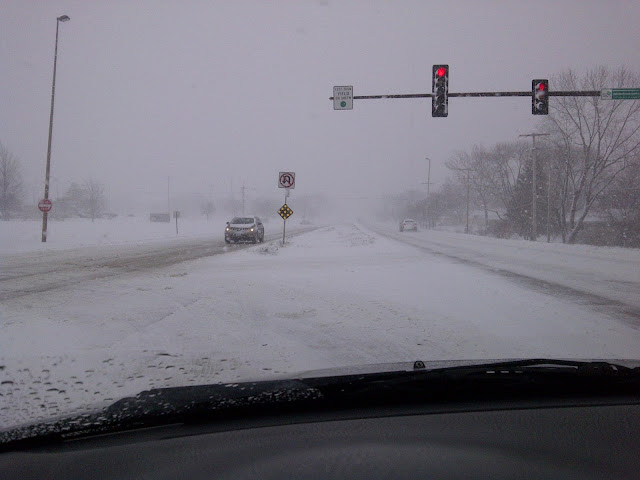
View out windshield of snow covered road and low visibility at stoplight
Winter Driving Conditions: City
Image Source: Dr. Penny Pincher


The 24 hour forecast:  9 inches of snow with gusting winds...
The drive to work tomorrow: not fun...

Here are some winter driving tips to stay safe and get where you are going:

Tip 1: Don't drive if conditions are too dangerous

It's your car and your neck that will be at risk if you drive.  If it seems too dangerous to drive, then consider waiting to drive until conditions improve.  If you can delay driving for a few hours, this will give snow plows a chance to clear the roads and spread salt and sand.  How would you rather spend a couple hours- watching TV and drinking coffee at home, or stuck along the road waiting for a tow truck?

Tip 2: Drive while it is light outside

If it is before sunrise, wait until the sun is up- this will improve your ability to stay on the road if visibility is limited.  If sunset is approaching, consider driving and getting to your destination before it gets dark.

Tip 3: Drive Slowly

Road conditions may be more slippery than you realize... until it's too late.

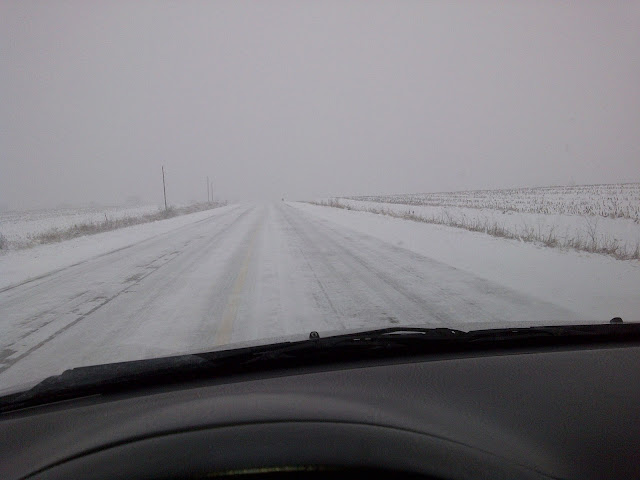
View out windshield of 100% snow covered road on rural highway
Winter Driving Conditions: Highway
Image Source: Dr. Penny Pincher


Tip 4: Easy on the brakes

Hitting the brakes suddenly can cause your vehicle to go out of control, even on a straight road.  Leave plenty of room between you and the car ahead so you can avoid sudden braking.

Tip 5: Forget full and complete stops

If you are driving on snow covered or really slippery roads, you may not want to stop completely at stop signs unless there is traffic.  You can reduce your chances of getting stuck if you slowly and carefully roll through stop signs.  Of course this is safe only if you can see that the intersection is clear of traffic.

Tip 6: Fill up before the storm hits

You are better off with a full tank of gas when driving in winter weather.  If you do get stuck, you can run your engine to stay warm until help arrives.  Also a full tank of gas will reduce the chances of fuel line freezing from condensation in the gas tank.

Tip 7: Put a coat and boots in the trunk

Prepare for the worst- let's say you slide into the ditch and need to walk a couple miles through a blizzard.  Having a coat and boots on board will make this situation a lot more manageable.

Tip 8: Clear your windshield, headlights, and brake lights before starting out

This will give you the best chance of arriving safely


View out side window of snow covered interstate highway on-ramp
Winter Driving Conditions: Interstate
Image Source: Dr. Penny Pincher


Tip 9: Even 4x4 vehicles are dangerous in slippery conditions

Vehicles like four wheel drive SUVs and pickup trucks have a high center of gravity and can roll over easily if they slide off the road.  Be especially careful in slippery conditions if you are driving such a vehicle.

Tip 10: Make sure you have your cell phone- and make sure it is charged up

If you do have an accident, having a cell phone available will help you deal with the situation


Recommended reading:


Copyright © 2013 Dr. Penny Pincher.  All Rights Reserved.  Privacy Policy


Thursday, February 14, 2013

Selling a car: What to do?


Selling a car: What to Do?


What to do to sell a car? There are free resources available on-line to help you sell your car quickly.  You will need to prepare the car to sell, set the right price for the car, advertise the car for sale, respond to questions from potential buyers, and close the deal.  You will need to accept payment from the buyer, sign the title of the vehicle over to the buyer, and write up a bill of sale.   These steps explain what to do when selling a car.


Truck with for sale sign on windshield
What to do to sell your car
Image source: Dr. Penny Pincher

Step 1.  Prepare the Car to Sell

You will get the best price for your car and sell it more quickly if you prepare the vehicle before trying to sell it.  Simply washing the car and vacuuming and wiping down the interior will make your car more attractive to buyers.  Use Armor All or other conditioner on the dashboard to make it look new again.  Use glass cleaner to wash the inside of the windows and polish the instrument panel.

Buyers may be scared away if they think that your car has mechanical problems or has not been properly maintained.  Get an oil change and make sure the service sticker is applied so that buyers can see that has up-to-date maintenance.  If your car has scratches or chips in the paint, get matching touch-up paint at an auto parts store.  You can get a small bottle of car paint that includes a brush built-in to the cap for under $10.

Perform any minor repairs such as replacing burned out light bulbs or headlights.  You may not have been bothered by this sort of minor issue, but buyers will see this a sign that the car has not been maintained and may have bigger problems.  Also make sure the check engine light is not on.  Sometimes a minor issue, such as a low fluid level or broken or missing gas cap can cause this light to come on.  If the car does need expensive repairs that you are not planning to have done- get an estimate for the repair.  You can use this in negotiation with a potential buyer.

  • Wash exterior 
  • Vacuum carpets
  • Wipe down dash board with Armor All
  • Wash inside of windows with glass cleaner
  • Polish instrument panel with glass cleaner
  • Get an oil change with service sticker
  • Touch-up paint on any scratches or exposed metal
  • Minor repairs such as replacing burned out light bulbs
  • Get service done so check engine light is not on (if possible)


Step 2. Set the Price for your Car

If you set your asking price too high, it will take a very long time to sell your car.  If buyers think your price is too high, they will often not even look at your vehicle.  How do you find out the right price for your used car?  You will need to look at book value prices.  Kelly Blue Book (KBB) and NADA book value are two of the most widely used sources of used car pricing information.  You can also check to see what prices are like for similar vehicles on sites like craigslist and autotrader.

You will need to enter the year, make, and model of your car.  The make is the vehicle manufacturer such as "Ford" or "Toyota".  The model is the model name of your car such as "Fusion" or "Tundra".  You may also be asked for the vehicle style such as coupe (two door car), sedan (four door vehicle), hatchback (four doors, plus rear hatch), etc.  Another question will be the "trim level".  This is often described using letters that follow the model name such as "EX" or "XLT".  These letters may indicate which options package was installed when the vehicle was purchased as a new vehicle.

The value of your vehicle depends a lot on the mileage and on its condition.  You can match descriptions of vehicle condition to the actual condition of your vehicle.  Many people overestimate the condition of their vehicle and set the price too high.  Another mistake that sellers make is to assume that a buyer will really like their car and be willing to pay a little more.  The fact is that there are lots of cars for sale, and that serious buyers know how to check the book value of vehicles.  You could get lucky and find a buyer that will pay more than book price, but the most likely outcome is that it will take a long time to sell you car if your price is too high.

However, it is usually not a good idea set the price at the lowest amount that you would accept.  A good starting price is a little bit higher than the minimum price that your would accept.  This leaves you some room for negotiating with the seller.  Most sellers will not offer your asking price.  Sellers will expect you to come down in price a bit during negotiation.  They may point out minor issues and then reduce the price accordingly.  If you build a little margin into your asking price, you will be in a position to negotiate and close the deal.

Step 3. Advertise Your Car to Buyers

Now you have your car polished up and looking good.  You have picked out a fair price that leaves you a little room to negotiate to close the deal.  Now it's time to find a buyer.

There are several on-line sites where you can list a vehicle for sale.  You will want to post pictures, a description, and your asking price.  Include the year, make, model, mileage, and asking price.  Include your contact information for both day and evening hours.  Take the pictures of your car in good daytime lighting including interior and exterior.  Here are some options for listing your car for sale:

  • Craigslist is a great place to list a car for sale.  It's free and simple to do yourself.  
  • Autotrader costs $25 for a 3 week listing
  • Newspaper classified ads cost varies with the size of the newspaper and includes print and on-line advertisement
  • eBay motors is another possibility, but this may not be the best way to reach local buyers.
Your car can also be used as an advertisement.  Place a "For Sale" sign with your phone number in the car.  If possible, park it in a busy parking lot where lots of people will see it.  You can get a windshield marker to write on the windshield as well.


For sale sign with year, price, and phone number
This car is a moving advertisement
Image source: Dr. Penny Pincher


Step 4. Field Inquiries from Buyers

Buyers will ask questions to get a sense of both the car and of you, the seller.  Some common questions include:

How often did you change the oil?
Buyers ask this to size up how will you took car of the car and how likely it is that there is something wrong with it.

Is there anything wrong with the car?
Buyers are rightly concerned that a used car may have hidden issues that will be expensive to repair.

Why are you selling the car?  
Buyers ask this to try to find out if there is something wrong with the car, for example you just found out that the transmission is bad so you're selling it rather than repairing it...

Is the price negotiable?
I think that saying the price is firm tends to turn buyers off.  If the buyer thinks that there is at least a chance of getting a bargain, they are much more likely to look at the vehicle.  If they look at it, they might buy it.  A good way to answer this question is that you set the price below book value but you would be willing to consider a reasonable offer.

When can I see the car?  Can I take the car for a test drive?
Now you're getting somewhere!  Make it as convenient as possible for the buyer to see your car.  It is a good idea to ask to see a drivers license before you let someone drive your car.  You'll have to decide if you want to ride with strangers on a test drive or not.


Step 5.  Sell the Car

The moment of truth has arrived.  A buyer makes an offer to buy your car.  The offer is little lower than you had hoped for, but it is exciting to get an offer.  You make a counter offer that is a couple hundred dollars higher.  The buyer accepts.  What to do now?

Accept Payment for the Car
In order to complete the deal, you will need to accept payment for the vehicle.  The best form of payment is a cashier's check from a local bank.  The buyer can obtain one at his/her bank.  This is a bit of a hassle for the buyer, but do you want to risk taking a personal check?  If you sign the vehicle title over to the buyer and the check doesn't go through... what a mess.  A local cashier's check will ensure that there will be no problem with the payment.  Cash also works well.

Write a Bill of Sale
You can hand write a bill of sale, or type one up.  This is simply a statement that the buyer is purchasing your car (include year, make, and model of vehicle with the number of miles on the odometer) for the purchase price.  Make a copy for you and one for the buyer.  Both the buyer and seller sign both copies.  This will eliminate any potential misunderstandings later.

Sign the Title of the Vehicle over to the Seller
The back of the title to the car has instructions for transfer of ownership.  Read carefully and make sure you are comfortable that you have received payment before signing over the title.

Remove the License Plates
The buyer will need to register the vehicle and get license plates.  You can turn in the old plates and get a refund for any vehicle registration fee that has been paid.  If the buyer is stopped and asked about the missing license plates, the bill of sale will provide an explanation.  Also remember to call your auto insurance company and terminate your coverage on the vehicle you sold.


Recommended reading:
How to Buy a Used Pickup Truck


Copyright © 2013 Dr. Penny Pincher.  All Rights Reserved.  Privacy Policy


Saturday, February 2, 2013

Can You Save Money Driving a Car with Manual Transmission? Is a stick shift more economical?


Conventional Wisdom: You Get Better Gas Mileage With A Stick Shift

Driving a manual transmission vehicle is more economical than driving an automatic transmission vehicle for two reasons.

  1. Manual transmission vehicles get better gas mileage.  
  2. Since manual transmissions cost less to repair, you will come out ahead in total cost of ownership over the life of the vehicle


Automatic transmission lever on a new vehicle
Automatic Transmission- 2013 Honda Crosstour
Image Source: Dr. Penny Pincher

Conventional Wisdom is Wrong!

Automatic transmission vehicles are now more economical than manual transmission vehicles.  Automatic transmissions have become much more efficient in recent years, in fact more efficient than a driver with a manual transmission in many cases.  Not only that, but the resale value of a vehicle with automatic transmission is significantly higher than for that of a vehicle with manual transmission.  When did this happen? I thought manual transmission was more economical...

Gas Mileage: Automatic Transmission vs Manual Transmission


Let's check the gas mileage of some modern vehicles, looking at the automatic and manual transmission versions of the same vehicle.  This gas mileage data can be obtained from fueleconomy.gov.

The table below shows that in newer vehicles, the mpg is about the same between manual and automatic transmission versions of the same vehicle model.  

Table shows most vehicles get similar fuel economy with manual or automatic transmission
Table of fuel economy (mpg) for manual transmission and automatic transmission vehicles.  Modern vehicles get about the same mpg with manual or automatic transmission.
Source: Dr. Penny Pincher

So automatic and manual transmission vehicles get essentially the same gas mileage.  When did this happen?  Let's look at the combined city/highway gas mileage of the Honda Civic from 1984 to 2012.  Back in the 1980's and 1990's, the fuel economy of the manual transmission was much higher- nearly 10 mpg higher.


Graph shows manual transmission got better gas mileage until 2007
Plot of Honda Civic gas mileage from 1984 to 2012 shows that automatic transmission overtakes manual transmission as more fuel efficient.  Source: Dr. Penny Pincher

But the Honda Civic grew larger (heavier) and its automatic transmission grew more efficient.  By 2007, the automatic transmission delivers higher combined gas mileage than the manual transmission.  This is due to improvements in automatic transmission efficiency.

Repair Costs vs Resale Value

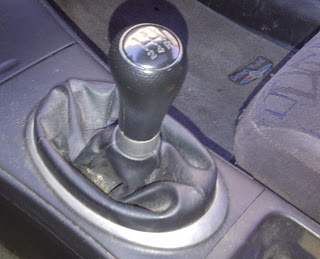
Manual transmission lever
Manual transmission in 2002 Honda Civic
Image source: Dr. Penny Pincher
Another argument for selecting a manual transmission over an automatic is that automatic transmissions cost more to repair.  This is still true- automatic transmissions are about 40 pounds heavier, contain more parts, and have more complex functionality than a manual transmission.  However, modern automatic transmissions are more reliable than ever.  Manual transmissions are less expensive to repair, but require more frequent repair and maintenance.

Resale value has become a big factor as well.  Fewer people than ever want to drive a manual transmission vehicle- or even know how.  If you want to sell your used manual transmission vehicle, there is a limited set of buyers that will be interested.  The resale value of a manual transmission vehicle compared to an automatic transmission vehicle may be thousands of dollars lower.


Penny Pinching Tips:


  • Newer automatic transmission vehicles have become a better value than manual transmission vehicles.
  • Automatic transmission vehicles and manual transmission vehicles now get equivalent gas mileage
  • Although repair costs for automatic transmissions are higher, automatic transmissions run longer without repair than manual transmissions.  
  • The reduced resale value of a manual transmission vehicle more than offsets the more expensive repair costs for automatic transmissions


Recommended reading:

Copyright © 2013 Dr. Penny Pincher.  All Rights Reserved.  Privacy Policy


Monday, January 28, 2013

How to Get Better Gas Mileage Without Getting a New Car or Truck


How to Get Better Gas Mileage with Your Car or Truck


The easiest way to get better mpg is to get a more fuel efficient car.  When I switched from driving a Ford F-150 pickup truck to a Honda Civic, I doubled my fuel economy overnight!

Graphic of gas gauge
Keep your gauge on full longer!
Image courtesy of supakitmod at FreeDigitalPhotos.net

But if you want (or need) to keep driving your current vehicle, there are some simple things you can do to get significantly better gas mileage.  By working to improve both the vehicle and the driver, you could see 5 mpg or more improvement.  You can see how much money a 5 mpg improvement in fuel economy would save you each month in fuel savings using the tables at:

How Much Would I Save on Gas with a More Fuel Efficient Car?

Improve the Vehicle to Get Better Gas Milage

Tip 1.  Keep tires properly inflated
Fuel Savings: 3 mpg

Picture of pressure monitor in tire valve stem, shows green when fully inflated
Valve stem tire pressure monitors cost under $10
Image source: Dr. Penny Pincher
On the inside of the driver's door is a sticker that will show the recommended tire inflation for your vehicle.  When tires are under inflated, they have more rolling resistance and you will get lower gas mileage.  The air pressure in tires changes as seasonal temperatures change and sometimes due to slow leaks.

I installed valve stem pressure monitors on my tires.  These cost less than $10 at an auto parts shop and are much easier to check than using an air pressure gauge.  A colored indicator shows green when the tire is properly inflated- easy to check when you refuel.
Tip 2. Replace air filter when dirty
Fuel Savings: 3 mpg
A dirty air filter prevents your engine from getting optimal mpg.  Air is routed to the engine for combustion through a path that includes the air filter.  Its job is to make sure dust and debris do not get into the engine, but when it gets dirty, the flow of air to the engine is reduced which reduces your fuel economy.  You can easily check and replace this filter yourself for about $10, or have this done at the shop with your oil change.


Tip 3.  Remove extra weight
Fuel Savings: 2 mpg
I can tell when I have driven with passengers in my car- my mpg drops!  This is due to the extra weight onboard.  You can't do much about driving with passengers sometimes, but there may be extra weight in your car that you don't need.  Do you keep lawn chairs in the trunk year round?  Do you haul library books around for weeks until you remember to return them?  Remove extra weight to boost your mpg.  Avoid using your vehicle as storage space- you are paying to haul that extra stuff around.

Improve the Driver to Get Better Gas Mileage

Shows exhaust from car tailpipe
Idling wastes fuel
Image source: Dr. Penny Pincher
Tip 4. Don't Idle the Vehicle
Fuel Savings: 2 mpg
This adds wear and tear to your engine and doesn't get you anywhere.  Turn your ignition off if you are stopped more than 1 minute or so.  Avoid running your heater or A/C while parked- instead go inside a building and wait.  This is one of the tricks that hybrid cars use to get good gas mileage- they turn off rather than idle.

Tip 5. Slow Down
Fuel Savings: 1 mpg
Driving above 60 mph cuts your mpg significantly.  Speeding doesn't save you that much time: if you drive 10 miles at 70 miles per hour vs. 55 miles per hour, you would save only about 2 minutes.  Choose a reasonable driving speed and set the cruise control to avoid having your speed creep up.  Simply driving at or below the speed limit saves fuel.

Tip 6. Avoid rapid acceleration and deceleration
Fuel Savings: 1 mpg
Accelerate slowly and steadily.  Try to time lights so you don't need to brake rapidly  Keep your car's momentum going, accelerating takes a lot of fuel.  Think of rapid acceleration as guzzling, slow acceleration as sipping.


Tip 7. Use a GPS navigation system
Fuel Savings: A lot if you get lost frequently!
Avoid getting lost- this wastes gas and time.  Also a GPS unit can help you find more efficient routes with less traffic.  City driving results in much lower fuel efficiency than highway driving due to the starts and stops. Most GPS systems have route selection modes where you can avoid traffic- this can help your mileage approach highway driving levels.  You can find GPS systems for your vehicle starting around $100.


Tip 8. Climate Control
Fuel Savings: 1 mpg
Keep windows up at highway speed, use the A/C if needed.  At slower speeds, or if you're stopped, you're better off to put the windows down.  The engine has to work to turn the compressor belt on the A/C.  At slower speeds, it is less work for your engine to deal with the increased drag from having the windows down than with running the compressor.


Recommended reading:
How to check your gas mileage: Step-by-step instructions to calculate miles per gallon (mpg)

How Much Would I Save on Gas with a More Fuel Efficient Car or Truck?


Copyright © 2013 Dr. Penny Pincher.  All Rights Reserved.  Privacy Policy

Thursday, January 24, 2013

How to check your gas mileage: Step-by-step instructions to calculate miles per gallon (mpg)

Check you Gas Mileage and Save Money

Gas mileage is measured in mpg:  miles per gallon.  The calculation of miles per gallon is the miles driven divided by the gallons of fuel used to drive those miles.  This article provides step-by-step instructions with pictures to measure miles driven, measure gallons of gas consumed, and calculate gas mileage in miles per gallon.

Checking your miles per gallon is useful to figure out how much it costs to operate your car- this can be an important factor in deciding whether to get a different car.  Also, the mpg performance of your vehicle provides an indicator when maintenance may be needed- if your mpg dips this may indicate low tire pressure or a dirty air filter.  By tracking your mpg, you will be able to notice driving habits that lower your fuel efficiency.

MPG Monitor Mischief- Conspiracy Theory

Some newer cars automatically calculate and display gas mileage instantaneously as you drive on a fuel consumption display.  So if you have a built-in mpg monitor, you never need to check gas mileage yourself- right?  I would check it myself the old fashioned way, using my own measurements of miles driven and gallons of fuel consumed.  Why?  There has been at least one instance of a hybrid vehicle with inflated mpg ratings placed on the window sticker.  A high miles per gallon rating sells a lot of cars.  Carmakers have a huge incentive to display the highest mpg number on the indicator while you’re driving too.  If you test drive a car that displays a high mpg, you’re more likely to buy it.  After you buy it, if you think you’re getting great gas mileage, you’ll probably have higher satisfaction with the vehicle- and be more likely to recommend the vehicle and even buy another one.

Wouldn’t people notice if the mpg number  on the display is a little high all the time?  Unlikely.  How many people with an automatic mpg monitor ever manually check the mileage and compare?   Even if you have an automatic mpg monitor, check it yourself with these steps.

Step-by-step Instructions to Check your Gas Mileage


1. Reset trip counter at your next fill-up.  Fill the gas tank all the way full.
Most odometers have a trip counter.  This is an odometer that can be reset to zero by pushing a button.
Resetting the trip counter will start tracking miles driven on this tank of gas.

What if I don't have a trip counter?  You'll need to record the odometer reading now to use later.

Press button to reset trip counter to zero
Fill gas tank full and reset the trip counter
Image source: Dr. Penny Pincher


2. At your next fill-up, note how many gallons it takes to fill the tank all the way full.
You can get the gallons from reading the display on the pump, or from your receipt.

Fuel pump showing gallons of gas pumped
Record the gallons needed to fill the tank.  This is available on the pump display, or on your gas receipt.  The reading is 8.949 gallons.
Image source: Dr. Penny Pincher


3. Note how many miles are on your trip counter

Trip counter reads 330.7 miles
The trip counter with miles driven : 330.7 miles
Image source: Dr. Penny Pincher


Tip: write mileage from trip counter on the receipt so you can do the math later

Receipt with 330.7 miles written and 8.949 gallons of gas printed
The gas receipt shows gallons used to fill the tank.  You'll also need the miles driven from your trip counter.
Image source: Dr. Penny Pincher


What  if I don't have a trip counter?  Take the current odometer reading and subtract the reading you wrote down in step 1.  This is the number of miles driven on the current tank of gas.


4. Divide miles from trip counter by gallons from receipt or gas pump display.
Most people will want to use a calculator for this step.
For example, if your trip counter reads 330.7 miles and you used 8.949 gallons of gas, the calculation is:
330.7 miles   / 8.949 gallons  = 36.95 miles per gallon (mpg)


Calculator showing result of 36.95mpg
Tip: I keep a $1 calculator that my kids gave me in the car.  The calculator on a cell phone or computer will work as well.
Image source: Dr. Penny Pincher

Example calculation:
How to calculate miles per gallon using a calculator:

  1. enter 330.7
  2. press division key
  3. enter 8.949
  4. press equals key

The answer shows your gas mileage in miles per gallon, 36.95 in this example.

5.  Important- reset trip counter after you note the miles to start tracking miles for the next tank

You will need to reset the trip counter while you're still at the gas station to record the miles driven on you next tank.

Recommended reading:
How to Buy a Used Pickup Truck
How Much Would I Save on Gas with a More Fuel Efficient Car?
Copyright © 2013 Dr. Penny Pincher.  All Rights Reserved.  Privacy Policy

Recent Penny Pincher Posts