Saturday, May 30, 2015

Real Life on a Budget by Jessi Fearon

Book Review- Real Life on a Budget by Jessi Fearon


Real Life on a Budget by Jessi Fearon


If you are looking to improve your financial situation, having a budget that you can follow to meet your goals is essential.  Real Life on a Budget is easy to read and provides some solid advice on how to get on the right track financially.  This is the third book written by Jessi Fearon who also writes at the personal finance site The Budget Mama.

Real Life on a Budget is written in short chapters that cover topics related to setting financial goals, setting up an emergency fund, paying off debt, planning a budget, and dealing with issues that can derail a budget.  Each chapter ends with a "challenge" which prompts the reader to implement the concepts that were covered in each chapter.

I think most people who want to improve their financial situation will be able to relate to this book since it is written from the perspective of someone who was deep in debt from using credit cards to live above her means and was able to turn things around through frugal living and staying on a carefully planned budget.  Jessi describes the challenges of staying on a budget while balancing life with her husband and kids- this is the "real life" that is mentioned in the title.

If you don't have a budget, or have a budget that is not working for you, Real Life on a Budget would be useful reading.  This book is well-written and provides specific steps to set goals, plan a budget, get out of debt, and tips to stay on your budget.

Thanks to Jessi for providing an advance copy of the book to review here on Penny Pincher Journal.  The book will be distributed starting June 30, 2015 on Amazon and can be pre-ordered now.


Copyright © 2015 by Dr. Penny Pincher.  All Rights Reserved.  Privacy Policy

Wednesday, May 27, 2015

Decluttering: Get Money for Your Stuff, and Get Your Space Back!

Decluttering- Get Your Space and Money Back!


Taking Away a Load of Clutter
Image Source: Dr. Penny Pincher
Not so long ago, I saved almost everything.  If I had something, I didn't want to throw it away- what if I were to need it someday?  Why throw something away when I might need to buy the same thing again someday?

Broken items got saved- in case I got around to repairing them someday.  Even items that were not repairable got saved- in case I needed the spare parts for something someday.

I would even pick up free stuff that other people were giving away.  Actually, I still do that if is is something I will use immediately.  But I used to accumulate stuff- just in case I would need it someday, I would have it and I wouldn't need to pay for it.

Frugal thinking can tend to encourage keeping too much stuff.  This may sound like hoarding, but I think this is different since I didn't have any emotional attachment to the stuff.  I just didn't want to throw anything away that might be useful so I could avoid paying for it in the future.

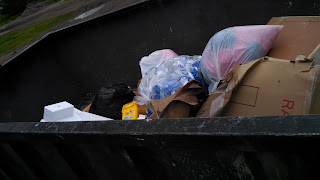
Dumpster of Clutter at the Landfill
Image Source: Dr. Penny Pincher

I came to realize that saving lots of stuff- even free stuff- has a cost.  My garage and even house was packed full with stuff I wasn't using.  Even if I wanted to use some of my stuff, it would be hard to find the good stuff since there was so much junk mixed in with the stuff.

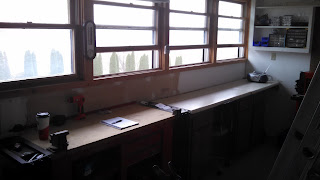
Now, I don't have as much stuff.  I still have a small stockpile of boards, fencing material, landscaping fabric, hardware, and an impressive collection of tools.  But now all of the things I have are things that I plan to use and they are all neatly organized in my shop and garage.  Sometimes less really is more.  I can easily find items when I need them, and I can usually remember what I have and where I put it.

So how did I go from having so much clutter to having a nicely organized shop and garage with just the right amount of stuff around to handle almost any project?  The answer: "decluttering".

I still feel a little pain throwing stuff away, but it has gotten easier.  I realized that I didn't miss any of the stuff I threw away after sorting it based on whether I had any plans or need to use it.

Another Load of Clutter from My Garage and Yard
Image Source: Dr. Penny Pincher
Decluttering doesn't necessarily mean throwing things away.  I sell a lot of things on craigslist and at consignment shops.  Sometimes I sell things on eBay and am surprised by how high the bidding goes.  Selling things certainly is less painful than throwing things away.

On my trip to haul away clutter, I loaded up my SUV and first stopped at the consignment shop on the way to the landfill.  That way I could see which items the consignment shop would accept and take the rest to the landfill.  To my delight, the consignment shop took everything that I offered.  This is a win-win.  I get paid for the stuff, and I don't have to pay to throw it away at the landfill.

Here are some tips on how to declutter to take back control of your living space:

  1. Start working in a small space- pick a room or even a part of a room and start sorting into "keep" and "go" piles.  Don't worry at this point about where stuff will go if it is in a "go" pile.  Put stuff in the "keep" pile if you use it or plan to use it soon.  Put everything else in the "go" pile- even if it was expensive or you just got it recently.
  2. OK, now you can worry about what will happen to the stuff in the "go" pile.  Move the "go" pile out to the garage or other area where you can sort it further and not worry about it ending up in the "keep" pile somehow.  Sort the "go" pile into piles for "sell" and "throw away". 
  3. Haul the "throw away" stuff to the landfill, or put it out on the curb with the trash.  If it makes you feel better, you can put a sign on the stuff that says "free" and see if anyone takes it.  I have actually gotten rid of a fair amount of stuff just by putting it out with a "free" sign.
  4. Now, have some fun with the "sell" pile.  The easiest way to deal with it is to take it to a consignment shop, but you'll only get about 40-50% of the sale price.  You can try to make more selling some of the better items on craigslist or eBay.  Another idea is to have a garage sale, but there are usually a lot of unsold items after a garage sale that you will still need to get rid of.


My Shop, After Decluttering
Image Source: Dr. Penny Pincher


Now, repeat this decluttering process on another room or part of a room and enjoy the free space and extra money you are getting back!

Also important- don't buy extra stuff to replace the clutter you have cleared out...


Copyright © 2015 by Dr. Penny Pincher.  All Rights Reserved.  Privacy Policy


Sunday, May 24, 2015

Free Dish Network Plan

Free Dish Network Plan

I signed up for the free plan from Dish Network!

See photo for details on how to activate the free Dish Network plan...

The Free Plan From Dish Network
Image Source: Dr. Penny Pincher

Actually, I have been without Dish Network for almost 2 years now.  I saw this satellite dish in the trash the other day and couldn't resist taking a picture.

Yes, Dish Network does have a free plan.  The free plan involves mailing your receiver back to Dish Network.  You can throw away your dish if you like.  The down side of the free plan is that you don't get any channels.  The up side is that your bill is $0.  You can see why I went with the free plan!

I still like to watch TV once in a while.  We get Netflix, Hulu, and Amazon Prime via internet, so we can watch plenty of movies and TV shows.  I prefer streaming video because you can watch whenever it is convenient.  You can also catch up on episodes if you fall behind.  Of course these streaming video services are not free, but they add up to much less than my Dish Network bill which was over $100 per month.

We use a Roku streaming video player, and I can get some news broadcasts on streaming news channels or on Roku's news video service.  If you don't want to pay for streaming video channels, there are lots of free streaming channels available on Roku.  You can sign up for streaming channels on Roku's website after you get your Roku player set up.


I also have an indoor HDTV antenna.  I can get a few channels with this, which is useful to watch live sports.  I like to watch some college and NFL football in the fall, and sometimes I like to watch local news and weather.  Of course buying an antenna is not free, but you can get an amplified antenna for under $40 and receive high definition (HD) over the air for free with no monthly bill.


Are you sold on the free Dish Network plan yet?  The free price is hard to beat, but you may want to get some streaming video services or an indoor HDTV antenna...


Copyright © 2015 by Dr. Penny Pincher.  All Rights Reserved.  Privacy Policy

Sunday, May 17, 2015

Penny Pincher Calculators

Calculate How Much Money You Can Save

Last year I got a used book on JavaScript at a half-price bookstore and figured out how to make calculators to let you figure out all sorts of things right on a web page.

Last night, I moved my JavaScript calculators from dppmoney.com to right here on Penny Pincher Journal..  I decided it would make more sense to have the calculators on Penny Pincher Journal instead of my other website.

Penny Pincher Calculators are Easy to Use- Just Type in Your Information and Click "Compute"
Penny Pincher Calculators are Easy to Use- Just Type in Your Information and Click "Compute".
This one calculates how long it takes to pay off a credit card and the total cost of payments.
Image Source: Dr. Penny Pincher

These JavaScript calculators are all really easy to use.  I tried to use color-coding and provide some example values right in the calculator so you can easily see how to use the calculators to better understand your financial options.

You can calculate some interesting things, such as how long it would take to save $1 million dollars.  You can also calculate how much you would save with credit card consolidation or how much you would save by refinancing your mortgage.

Penny Pincher Calculators

Here is a list of Penny Pincher calculators to help you save money:

Mortgage Refinance Calculator- calculate how much you would save by refinancing your mortgage.  How much lower would your house payments be after a refi?  Your mortgage is likely you biggest loan- you can save a lot of money if you can get a lower mortgage interest rate.

Debt Consolidation Calculator- calculate how much you would save on interest by combining several high interest debt accounts into a debt consolidation loan with a lower interest rate.  You would be surprised how much you can save on interest.

Credit Card Consolidation Calculator- calculate how much you could save by taking several high interest credit cards and consolidating these into a lower interest credit card consolidation loan.  Some credit card interest rates are 20% or even more.  Find out how much you can save with a balance transfer to a lower rate card.

Credit Card Payoff Calculator- figure out how long it will take to pay off your credit card.  Try out different monthly repayment amounts and see the effect on how long it takes to pay off a credit card and the total amount you will pay.

Monthly Car Payment Calculator- calculate your monthly car payment given the loan amount, interest rate, and length of loan.  How much car can you afford?  How much lower will your car payment be with a 5 year / 60 month loan or even a  6 year / 72 month loan?

Savings Calculator- let's say you deposit a certain amount of money every month and receive interest over time.  This calculator will let you figure out how much your savings will grow over time.

The Millionaire Calculator- this is my favorite.  Enter your savings rate and rate of return to figure out how long it will take to reach your goal.  The default goal is 1 million dollars.  You can also choose to account for inflation and capital gains when calculating how long it will take to get 1 million dollars of purchasing power.

Investment Calculator- let's say you are investing in a retirement fund and want to find out when you can retire.  Input how much you invest and your average return to calculate how long it will take to reach your goal.  You can account for inflation and capital gains tax.

Mortgage Payment Calculator- there is more to a house payment than principal and interest, you also pay taxes and insurance.  Use this calculator to estimate house payments including principal, interest, taxes, and insurance.

Walking Time Calculator- this one is not about money, but useful to figure out how long it will take to walk.  Enter the distance to walk and select your walking speed (leisurely, purposeful, or brisk) to get an accurate calculation of how long it will take to walk.  Walking is less expensive than driving and is healthy as well.

Check out these easy to use calculators to help you find ways to save money.

Copyright © 2015 by Dr. Penny Pincher.  All Rights Reserved.  Privacy Policy

Friday, May 15, 2015

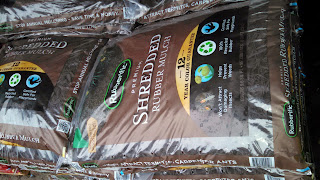
Rubberific Rubber Mulch- Lasts for Years

Rubberific Rubber Mulch


Bags of Rubberific Rubber Mulch
Image Source: Dr. Penny Pincher

When my wife brought home some bags of rubber mulch to try this spring, I was skeptical.  Regular wood mulch is pretty cheap and works pretty well.  We usually get the cheap Cyprus mulch.  The down side of wood mulch is that it breaks down and looks faded and old after less than a year.

Rubberific Rubber Mulch is an interesting idea.  It is made from shredded up tires that are dyed.  It looks just like wood mulch, and considering that old tires seem to last forever, I think this mulch will last a long time.

Rubberific Rubber Mulch In My Flower Bed
Image Source: Dr. Penny Pincher

The rubber mulch itself is really light since it is dry.  I am used to picking up bags of wood mulch that are much heavier for the same volume.  I was surprised how much the shredded rubber looks like chipped wood.  You wouldn't notice unless you are really looking closely.

Rubber mulch could be one of those things that is more expensive at first and pays for itself over the years.  Replacing mulch every year not only requires the cost of the mulch, but also time and the gas to drive around to get the mulch.  The Rubberific rubber mulch costs about 3 to 5 times as much as wood mulch, depending on what kind of wood mulch you get.  This product has a chance to be cost effective if it really does last 10 to 15 years.

Rubberific Rubber Mulch- Shredded Tires Looks Like Wood Mulch
Image Source: Dr. Penny Pincher

Just as I was getting impressed and thinking that rubber mulch really is "Rubberific", I remembered the mulch we used in a different flower bed this year.  It was a rock mulch.  The rock mulch will last much longer than 10-15 years- more like billions of years!  But wood mulch looks better than rocks in the shady location in front of our house, so the choice is between wood and rubber.  In the shade, it may last even longer than the advertised 10-15 years, so I may never need to replace it.

I can think of a few downsides to using rubber mulch.  It is more expensive than wood mulch.  Since the recycled tires certainly contain a lot of chemicals, I wouldn't want to use it around vegetable plants or fruit trees.  Also, I think rubber mulch placed in the sun could get really hot and maybe even smell like rubber tires on a hot day.

I think trying out rubber mulch in a shady flower bed is a good place to experiment with it.  If you use mulch in your landscaping, check out rubber mulch for a longer-lasting alternative to wood mulch.


Copyright © 2015 Dr. Penny Pincher.  All Rights Reserved.  Privacy Policy

Sunday, May 10, 2015

Can You Get Rich Writing eBooks?

How to Publish an eBook

My eBook For Sale on Amazon
Image Source: Dr. Penny Pincher
It is quite easy to publish an eBook.  Anyone can publish an eBook for free in a few hours.  The hard part is writing the material which can take months depending on the length of your book and how familiar you are with the subject.  You need to format the book correctly for publication as an eBook.  Here is an article that takes you through the details of how to publish an eBook.  


How Much Can You Make Publishing eBooks?

I have published two eBooks so far.  I see a lot of very short eBooks for sale, but my books are full length books at around 140 pages.  They provide a lot of information and value.

Both of my books are well-written (I say so anyway) and both are published on Amazon Kindle, Google Play, Apple iTunes, Barnes and Noble, and other booksellers.  I have used several free websites to announce my eBooks to promote them.  Both have received 5-star reviews on Amazon and elsewhere.

So, am I rich yet?

After I published my first eBook priced at $3.99, I was disappointed with the sales that it generated.  It has sold some copies, but not as many as I was expecting.  This is not really surprising- there are lots of eBooks out there, and Dr. Penny Pincher is still emerging as a leading author in the field of saving money.

Anyway, I decided to find out how much of a factor price is for eBook sales.  I decided to offer my second eBook for free.

How to Publish an eBook Listed as Free on Amazon

Let's Try Publishing a FREE eBook!

It actually took some work to get my book listed for free on Amazon.  I set it up to sell for free on Barnes and Noble, Free eBooks.net, and some other sites first.  Then I used the form on the book page at Amazon to report a lower price.  After a few months, Amazon changed the price to free.

Price made a huge difference in sales- in fact, I "sold" over 1,000 copies of my free eBook on Amazon in a single day!  My free eBook climbed the sales rank and was close to breaking into the top 100 best sellers on Amazon at one point.  Considering how many free eBooks are for sale, I though it was pretty good to rank so well- I think my best sales rank was around #120 or so.

My book priced at $3.99 has not sold nearly that well.  However, even if my free book were selling for $3.99, I wouldn't be rich from book sales.  My experience is that it is tough to sell eBooks.  There is so much competition and people are pretty selective about what they will buy.

I have seen videos on YouTube claiming that you can make $10,000 or $20,000 per month selling eBooks on Kindle Direct Publishing on Amazon.  Based on my experience, I don't believe it.  Unless you are a famous author or get really lucky, I don't see how you could make that kind of income selling eBooks.

Some of the advice is to choose a niche and publish lots and lots of eBooks in that area.  I don't see that working out.  I found that even though lots of people "bought" my free eBook, that did not really translate into many extra sales of my $3.99 eBook.  I think publishing lots of eBooks that don't make much still adds up to not much...

There are some benefits to publishing an eBook, even if it doesn't sell very well.  It adds some credibility for the author- you can say you have published a book in your field which carries some weight with most people.  It can also generate interest in your blog or website.  If people see your book for sale and don't want to pay to buy it, they might check out your blog or website to see what they can read there for free.

One downside of publishing a free eBook is, of course, that it resulted in pretty much no revenue.  When I launched my free eBook, I was thinking that readers of the free book would buy the $3.99 eBook and/or visit my blog after reading the book.  Either of these actions would generate revenue for me, but I have not seen a big bump even though lots of people are "buying" the free eBook.

Is Writing an eBook Worth It?

Overall, I would say that writing eBooks took a lot more time than writing material for my blogs and has resulted in less revenue.  But I enjoy being a book author and am glad I took the time to write in the longer format of a book.  When someone reads your eBook, they spend quite a bit of time with you- a lot more than a minute or two looking at a blog post- and you have a much better chance to make a lasting impression.

I am still deciding about whether to publish a third eBook.  I do think that publishing multiple eBooks would increase sales.  Having several books out there makes it easier to get discovered by readers who are searching for books.

There is a big potential to make money from eBooks if you can get enough sales.  I think it will be hard for me to resist trying again.  If I can make about $3 per book and I could sell thousands, that adds up to real money pretty fast.

Improving Sales for My Next eBook

For my next book, I may spend some time looking at the competition before I choose a topic and write the book.  I think there are a lot of books out there on "ways to save money" and this topic is pretty well covered on the Internet too.  For my next book, I will try to find a topic with less competition.

Also, I may try a shorter eBook- I see that the some eBooks that seem to have a lot of sales based on their sales rank are pretty short.  I think there are a lot of readers that don't want to spend more than an hour or so reading an eBook.  Also, it will be easier to write a shorter book, so that sounds good to me.

Finally, I may actually spend a few dollars to get a book cover design.  I made the book covers for my first two books myself, and they are not very professional looking.  People do judge a book by its cover, so this is an easy thing to improve.

So my next experiment in eBook publishing will likely be a shorter book with a nice book cover in a topic that has less competition.  Check back to see how this works out...


Copyright © 2015 Dr. Penny Pincher.  All Rights Reserved.  Privacy Policy


Tuesday, May 5, 2015

Cheap Duct Tape Projects and Repairs

Duct Tape for Cheap Projects and Repairs


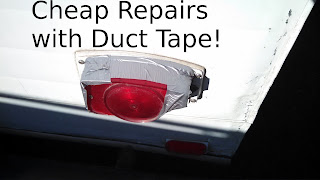
Trailer brake light repair with duct tape
About 35% of one of the brake light covers on my trailer was missing.  This was pretty easy to repair!
Image Source: Dr. Penny Pincher

Duct tape is useful for making quick repairs and doing simple projects.  If a few cents worth of duct tape can save you from replacing something for awhile at least, it is probably worth doing.  Some of the features I like about duct tape are:


  • Duct tape is fairly cheap, a few bucks for a roll 50 or 100 feet long that will last you a long time
  • Duct tape is durable, some repairs and projects using duct tape will last many years
  • Duct tape is easy to work with- you don't need any special tools, skills or experience


Duct Tape is Handy to Have Around for Projects and Repairs
Image Source: Dr. Penny Pincher


I like duct tape so much that I mentioned this as a topic in my most recent book as one of the 101 ways to save money.  You can read Tip 90 about using duct tape for cheap repairs here:
Tip 90: Duct Tape and Other Cheap Repairs

Duct Tape Repairs

Repair Gloves with Duct Tape

The other day while working in the garden, I felt some weeds poke my thumb.  This was surprising since I was wearing heavy leather gloves.  Unfortunately, a hole had developed in the thumb.  This was clearly a repair that called for duct tape.

Use Duct Tape to Repair Gloves
Image Source: Dr. Penny Pincher

It took about 1 minute to repair the glove with duct tape.  In the picture, you can see that one of the fingers has also been repaired with duct tape.  I put that duct tape on last fall, and it has lasted through quite a bit of use already.

Repair Garbage Can with Duct Tape

After making this repair, I decided to look around and see what other repairs and projects I had around that use duct tape.  I didn't have to look far.  Right next to the workbench where I repaired my gloves, I have a garbage can with the lid repaired with duct tape.

Garbage Can Repaired with Duct Tape
Image Source: Dr. Penny Pincher

It would seem silly to me to throw away a garbage can or garbage can lid that would be repaired with duct tape.  The lid had broken and it would no longer snap in place on top of the garbage can.  I was able to simply tape the lid back together so that it fits on nicely again.  This repair has lasted for about 6 months so far.  The duct tape if flexible enough to handle some abuse as the lid gets dropped to the ground by the garbage man every week.  I guess I could have used black duct tape to make the repair blend in a little better, but the silver doesn't really bother me.

Duct Tape Projects

Continuing my walk around the house to see where I have used duct tape, I found some projects where duct tape was a key component.

Window Crank Pole Duct Tape Project

The first is my contraption to crank open 2nd story windows.  Before I made my pole, I would need to use a ladder to open and close the windows.  The pole is an old telescoping pole for a swimming pool net.  I duct taped a loop of heavy shoe lace on the end.  I used more duct tape to pad the metal pole to avoid scraping up the window cranks.

Duct Tape on Pole to Crank 2nd Story Windows
Image Source: Dr. Penny Pincher

As you can see in the picture above, I got fancy and used two different kinds of duct tape.  I used the thinner, stickier 3M silver duct tape to hold the shoe lace in place, and then I used the thicker black Gorilla duct tape to provide padding over the exposed end of the pole.

Telescoping Pole to Crank High Windows
Image Source: Dr. Penny Pincher

This project was great- it only took about 15 minutes, it didn't cost anything since I had the materials around, and it was immediately useful.  I was able to crank my windows open that day without getting out a ladder.  I have been using my duct tape window pole for about 2 months now.

Temporary Table with Duct Tape

In the room with the high windows, I have a table set up to start vegetable plants from seeds for my garden.  The table I used is actually a temporary arrangement using some saw horses and scraps of wood.  I used duct tape to tape everything together.  With kids and pets running around, I wanted to make the temporary table as stable as possible.

Temporary Table from Scraps of Wood, Saw Horses, and Duct Tape
Image Source: Dr. Penny Pincher

Duct tape was handy for this project, since I was able to make a stable table using some pretty small scraps of wood.  I didn't want to put screws into the saw horses, and that would have been more work anyway.  Now that I am done with the temporary table- the plants are going into the straw bale garden this weekend- I can just remove the duct tape and get my scraps of wood and saw horses back to use for other projects.

Clothesline Ratchet with Duct Tape

My next project using duct tape was just outside.  My wife put up a nice clothesline this year.  I say nice because it was so quick and inexpensive since we were able to put a clothesline up around two trees.  The problem was that the clothesline would sag under the weight of clothes hanging on it.  It was a lot of trouble to untie the knots and adjust the line every time it sagged.  The cotton clothesline is stretchy and tends to sag a bit over time.  I bought a metal ratchet that is normally used for a wire fence to use to tighten up the clothesline easily.  I was worried that the metal ratchet would cut the clothesline where the metal was in contact with the cotton clothesline, so I wrapped this part of the clothesline with duct tape to protect it.


Ratchet to Tighten Clothesline Protected with Duct Tape
Image Source: Dr. Penny Pincher
I used my favorite 3M silver duct tape again for this project.  You can see the duct tape to the left of the ratchet in the photo where I wrapped it around the clothesline to protect it from being cut or damaged from the tension of the line against the metal edge of the ratchet.  Just pull on the short piece of line hanging down to tighten up the clothesline.


I didn't need to try very hard to find examples of duct tape projects and duct tape repairs around my house.  A little creativity and a little duct tape can go a long way for making cheap repairs and doing quick and easy projects.

Copyright © 2015 Dr. Penny Pincher.  All Rights Reserved.  Privacy Policy

Monday, April 20, 2015

Straw Bale Gardening: Timeline Journal

Straw Bale Gardening: Timeline Journal

How long does it take to start a straw bale garden?  You need to obtain straw bales, condition the bales, and plant your garden in (or on) the straw bales.  How long does this process take?  Here is the timeline for starting my straw bale garden from scratch in 2015.

Note: the location is in southeastern Iowa where the last frost date is around May 10.  Planting dates in your location may vary...

If you want to learn all about straw bale gardens, you can learn everything from planning through harvest:

March 28: Started seeds growing in indoor trays.  These plants will be moved into the straw bales later on.  You can buy plants at a green house or grocery store to plant in your straw bales, but we started our own to save money.
Starting Plants for Straw Bale Garden
Image Source: Dr. Penny Pincher

April 3: Bought 25 bales of straw from a local farmer.  I decided on 25 bales since this many bales would fit well in the space I had in mind.  Also, 25 straw bales is about the maxim number that will fit in a single pick-up truck load.
Bringing Home Straw Bales
Image Source: Dr. Penny Pincher


April 4:  Put down landscape fabric, set the bales in place, and staked them down.  This article talks about how to get started at straw bale gardening.

Straw Bales in Place for Straw Bale Garden
Image Source: Dr. Penny Pincher


April 9:  Started 10 day straw bale conditioning.  Conditioning adds fertilizer into bales and starts the bales breaking down into compost.  This article has the recipe for what to add to condition the bales.

Conditioning Straw Bales for Planting
Image Source: Dr. Penny Pincher


April 18: Last day of straw bale conditioning.  Added wood ash and bone meal in addition to compost fertilizer.

April 19:  First planting today.  Planted spinach from seeds and seed potatoes.  I planted the spinach seeds on top of two straw bales in about an inch of topsoil.  I stuck the seed potato segments about 4 inches deep into two straw bales.  I used a small garden trowel to dig down into the bale so I could put the seed potatoes in.  There was no need to add soil on top for the potatoes.  The straw is getting soft and is clearly starting to break down into compost.

Spinach Seeds Planted in Soil On Top of Straw Bale
Image Source: Dr. Penny Pincher

April 22: Planted peas today.  Just stuck the pea seeds down into the bales with no topsoil.  Planted 80 seeds in two bales.

April 30: The spinach sprouted today.  We planted this from seeds 11 days ago.

Today we planted broccoli, cauliflower, and onions.  The broccoli and cauliflower were small plants and the onions were onion sets for planting.

Broccoli and Cauliflower Planted in Straw Bales
Image Source: Dr. Penny Pincher
Onion Sets Planted in Straw Bale
Image Source: Dr. Penny Pincher
Spinach Sprouted from Seed
Image Source: Dr. Penny Pincher

May 2: Peas are up today!  We noticed that they are starting to poke up out of the straw this afternoon.

May 14: Cucumbers are planted in the bales.  These were started from seeds and transplanted into the bales.

May 23:  Planted the remaining vegetables in the bales.  It has been cold and rainy this year, so we kept our plants inside to let them get a little bigger before we moved them out.  Here's what we planted today in the bales:

  • String Beans from seeds
  • Peppers
  • Jalapeno Peppers
  • Tomoatoes
  • Cantalope

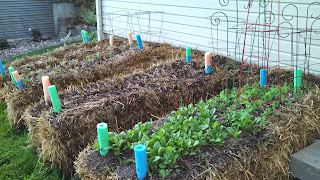
As you can see on the right side of the garden, the spinach and peas are off to a good start.  The bales are breaking down nicely- it was very easy to poke the bean seeds right into the bales.

Everything is Planted- the Spinach and Peas are off to a good start.
Image Source: Dr. Penny Pincher

May 28:  The potatoes planted from seed potatoes are coming up.  I was beginning to wonder if they were going to grow or not.  Also, the green beans planted 5 days ago from seed are coming up already.

June 10:  First harvest from the straw bale garden today- spinach!  My wife picked enough to make a giant salad for lunch to take to work and I did the same.  The spinach has been ready since at least June 1, but just got around to harvesting it.

Straw Bale Garden in June- Everything is Growing
Image Source: Dr. Penny Pincher
I will keep adding to the straw bale gardening timeline journal- stop back to see how it turns out and how long it takes for a straw bale garden to produce vegetables...

Copyright © 2015 Dr. Penny Pincher.  All Rights Reserved.  Privacy Policy
Sunday, April 12, 2015

Rust Converter- Turn Rusty Metal into Primer

Rust Converter- Restore Rusty Items

I have always been interested in rust converter.  You can put rust converter on a rusty metal surface and it forms a black protective coat, ready for painting.  Rust converter works using a chemical reaction with tannic acid which converts iron oxide into black colored ferric tannate, which is much more stable than rust.  I like that rust converter chemically reacts with the rust to convert it to something else.  I like the idea of changing the rust into something else instead of just painting over it and watching it rust through again later.

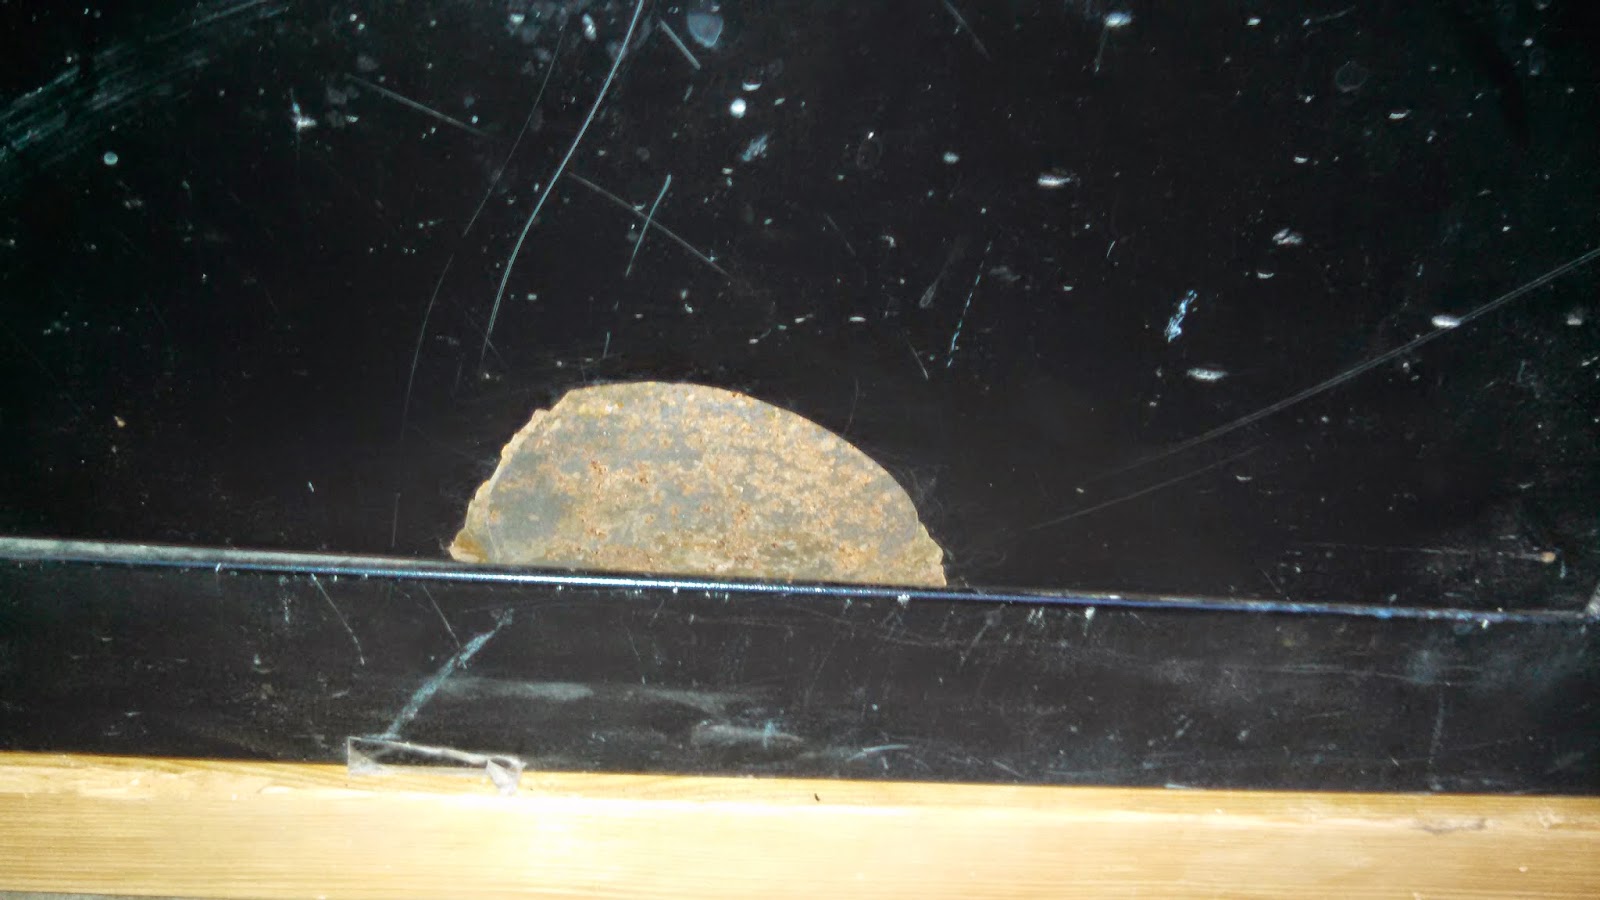
My son's car has some rust coming through at the bottom.  Conveniently, his car is black, so the black ferric tannate will almost match his car's color.  I also have a black metal cabinet in my shop that has a rusty spot about 1 inch tall by 2 inches wide where the paint chipped off.  I'll try the rust converter on the metal cabinet first before we try it on my son's car.

Before Rust Converter


Rusty Metal Surface- Before Rust Converter
Image Source: Dr. Penny Pincher

As you can see, there is a rusty spot on my metal cabinet.  This is a great place to try out the rust converter.

Permatex Rust Converter
Image Source: Dr. Penny Pincher

I went with Permatex Rust Treatment, which is a rust converter.  An 8 oz bottle which can convert 20 square feet sells for about $6.50.  A 16 oz bottle sells for around $10.  You can buy this at a car parts store or on amazon:
Permatex 81773 Rust Treatment , 16 oz.

Applying Rust Converter with Small Paintbrush
Image Source: Dr. Penny Pincher

When applying rust converter, it is important to pour a small amount into a different container.  If you dip your brush into the bottle, the chemical can activate from rust on your brush, ruining the whole bottle of rust converter.  I found a cup in my recycling bin and wiped it out.  I poured a very small amount into the cup since my rusty surface was pretty small.  I used a small paintbrush to apply the rust converter to the rusty surface.

Rust Converter- First Coat, Wet
Image Source: Dr. Penny Pincher

The photo above shows the first coat of rust converter while it is still wet.  It didn't take much at all to cover this small rusty patch.  After 15 minutes, I put on a second coat.  The photo below shows the rusty area with a second coat of rust converter while still wet.


Rust Converter, Second Coat, Wet
Image Source: Dr. Penny Pincher

At this point, I was a bit worried.  I was putting the rust converter on to make the rusty spot less noticeable, but now it was very noticeable since it was white.  I went let the rust converter dry overnight and came back to check out the results the next morning.

After Rust Converter

I was happy to see that the rust converter did turn black as promised.  The rust converter is suitable as a primer.  I think the black color is close enough, and the metal cabinet is in a protected area in my shop, so I don't think I will paint it.  I will just leave the rust converter as the top coat.


After Rust Converter- The Rust is Completely Converted to Black Primer
Image Source: Dr. Penny Pincher


Close-up of Rusty Surface After Rust Converter.  The Rust Has Transformed into a Black Surface.
Close-up of Rusty Surface After Rust Converter.  The Rust Has Transformed into a Black Surface.
Image Source: Dr. Penny Pincher

I will definitely go ahead and use rust converter on my son's car.  I will plan to put paint on over the rust converter since the car will be exposed to water and salt in the winter.

Rust converter is a great way to take care of rusty surfaces, stopping the rust and providing a good primer coat that can be painted.

Permatex 81773 Rust Treatment , 16 oz.

Copyright © 2015 Dr. Penny Pincher.  All Rights Reserved.  Privacy Policy


Thursday, April 9, 2015

Buy In Bulk: Save Money

Buy in Bulk and Save

Bulk Toilet Paper- Case of 80 Rolls!
Image Source: Dr. Penny Pincher

Tonight I was looking for a replacement spark plug for my riding lawn mower.  I pulled up the manual to find the exact type of spark plug that was recommended, then searched on Amazon to find one.  I have Amazon Prime, so I get free shipping on most things.

I found the spark plugs selling for $4 to $5 each.  Some two-packs were $8.  The manual wasn't clear whether I need one spark plug or two spark plug, and I couldn't remember if this engine has one cylinder or 2 cylinders.  I figured I might as well buy two- I'll either use them both this year, or if I only need one then I'll have it ready for next year.

Then I came across a deal for a 24-pack of  the same spark plugs for $8.57.  Shipping was still free, but delayed by a couple days since the package was heavy.  This pack was marked down from $83.76 which works out to $3.49 per spark plug.  At $8.57 for 24 spark plugs, that works out to about 36 cents per spark plug!  The bulk spark plugs are packaged in compact case, rather than individually packaged in cardboard boxes.

Bulk Spark Plugs- Case of 24
Bulk Spark Plugs- Save with a 24-pack
Image Source: Dr. Penny Pincher

I decided to buy spark plugs in bulk.  I have room in my shop to store the box of spark plugs, and I will be set with spark plugs for the life of my riding mower and then some.  I'm sure my wife will think it is a little ridiculous to buy a 24-pack of spark plugs, but it's a great deal!  I could sell or give away spark plugs to friends and still have plenty of spark plugs.  Buying 24 didn't cost much more than buying 2.

What to Buy in Bulk?

This bulk purchase of spark plugs got me thinking about buying in bulk.  What other things do I buy in bulk to save money?


Clearance Items You Know You Will Use

A few months ago, I found some really high quality oatmeal on clearance and bought a ton of it.  I bet I ended up buying a full shopping cart of boxes of oatmeal.  This is great stuff, and only cost 4 cents per serving.  That's hard to beat.  Before buying, I checked the expiration date and tried to estimate how much I would eat before it expired.  I know that food stays good a bit past the expiration date, but I didn't want to get carried away and buy more than I really needed.  Still being cautious, I bought a few boxes to take and home and try it.  After finding out that it was good stuff, I went back to the store and bought more.

So one category of item to buy in bulk is clearance items that you know you will use.  I wasn't shopping for oatmeal that day, but when I saw it so cheap, I knew I could save a lot of money if I bought it.  The cheap oatmeal saved me money since I needed to buy less food.

Things You Buy Anyway

Another category of item to buy in bulk is stuff that you are going to buy anyway.  I have dogs, so I need to buy dog food.  I buy the biggest bag of dog food that they sell.  The same goes for my cat food.  Bulk bags are not the most convenient size to haul around, but it is the least expensive per pound.  Take the cost of the bag and divide by the number of pounds to get the cost per pound.  The bigger bags of pet food are a lot less expensive per pound.

One benefit of buying pet food in bulk is that I don't need to buy it very often.  The big bags last a long time, which means I spend less on gas driving to the store to pick up pet food.

Toilet paper is another thing I buy in bulk.  We get big bales of 24 rolls, which is the lowest price per roll.  One downside is that we need lots of space in the closet to store toilet paper.  The upside is that this saves money, and we usually have plenty of toilet paper around.

Other than the bargain oatmeal that I mentioned, I can't really think of food items that I buy in bulk regularly.  Bulk food can get stale.  With food, I try to buy a little as possible.  I know some people buy tons of meat when it is on sale and put it in a freezer.  I don't have a freezer, so I haven't tried this.

When Buying In Bulk Wastes Money

There are plenty of ways that buying in bulk can go wrong, and you end up spending MORE money instead of saving money.

Things You'll Never Use

If you buy things you'll never use, it doesn't matter how good of a deal you got- the money spent is wasted money.  Imagine if you bought tons and tons of blank VHS tapes in bulk, then you ended up getting a TiVo or Roku and no longer have a need to record TV shows on VHS tapes.  Not only are the video tapes wasted, but you wasted space storing something that you will never use.  Plus you wasted money that you didn't need to spend.  When you buy in bulk, it commits you to use a lot of something and sometimes this doesn't work out.

With my example of buying spark plugs in bulk, I am taking a some risk that my lawn mower will break down and I will not need that type of spark plug anymore if I get a different one.  But I am not too worried because the spark plugs were so cheap, and I think I could probably sell extra ones on craigslist if I wanted.

No Room For All The Bulk Stuff

Another problem is if you actually buy more stuff than you have room to store trying to get the lowest unit cost.  At Sam's Club, you can buy some very large quantities of items.  I could imagine someone buying 144 rolls of toilet paper trying to get the best price per roll.  Then you really would need an entire closet to store it all.  Or you can buy a 50 pound bag of rice for really cheap- but where will you put it?  Running out of room in your house is not only inconvenient, but it can cost money.  If you have so much stuff packed into closets and cupboards that you can't find anything, you might end up buying things that you already have.  If your house gets too crowded, you might end up renting a storage garage, or even moving to a bigger house.  Added expenses like this would greatly offset savings from bulk toilet paper!

Finally, buying perishable items in bulk is risky.  You may have good intentions to use the perishable items right away, or to can or freeze them.  But there is a chance the bulk purchase will get stale or spoil before you can use it all.  In this case, you may be better off buying a smaller quantity and not wasting any than buying a bulk amount and wasting some of it.

Buy in Bulk

If you are careful, you can save money buying in bulk.  Make sure to buy items that you know you will use and that you have room to store.  It is worth checking the savings before buying in bulk- it is not always cheaper to buy in bulk.

Copyright © 2015 Dr. Penny Pincher.  All Rights Reserved.  Privacy Policy
Recent Penny Pincher Posts