Showing posts with label Product Reviews. Show all posts

Sunday, November 1, 2015

Used EVO CX Exercise Bike Review

Used EVO CX Exercise Bike Review


Used EVO CX Exercise Bike

I am always looking out for cheap used exercise equipment that I can use to stay in shape.  I have been looking for an exercise bike for a year or so since my old 20 year old Schwinn Airdyne broke.  I wanted something much more sturdy and capable of providing a quick, intense workout.

Last week, I found what I was looking for- and more- at the 2nd Wind used exercise equipment store.


The store obtained some used professional grade exercise bikes from a fitness center and was offering them at a substantial discount.  The EVO CX can be ridden like a standard exercise bike, but it has a neat trick.  It has a sway mechanism that allows you to stand up and work your core.  This simulates the motion of standing up and riding a bike up a steep hill.  What a workout!  I feel like I could leap over a small building after doing this a few times...

This sturdy piece of gear is just what I needed.  It is a heavy item, I would guess it weighs around 100 pounds.  I had my teenage son help carry it to my exercise room upstairs.  The base does have wheels to make it easy to position in your workout room.

The EVO CX is quickly and easily adjustable since it is designed for heavy use by people of different shapes and sizes in a fitness club.  It has a nice handle bar assembly that holds 2 water bottles plus your cell phone.  The hand rest allows a lot of different hand and arm positions while riding.

This is a simple "spinner" exercise bike.  You don't need to plug it in, and it does not have automatic exercise programs.  There is a red resistance knob that you can turn to increase or decrease the resistance.  Pushing the button stops the pedals from spinning when you are ready to stop.

 EVO CX Professional Grade Exercise Bike
EVO CX Professional Grade Exercise Bike

This bike includes a built-in computer to track your time, distance, and heart rate, although I did not get the wireless heart rate strap with my used model.

Really, this is two exercise machines in one.  You can ride this like a standard exercise bike, or you can set the switch to allow sway and stand up.  The exercise you get by standing up and swaying is more like running or sprinting.  I am in pretty good shape from riding my real bike up hills all summer, but this exercise bike is able to challenge me with a good workout that takes only a few minutes.

If you are looking for a really solid exercise bike to add a piece to your workout, check out the EVO CX.


These are pretty expensive new, check out used EVO CX on eBay:

EVO CX on eBay

Copyright © 2015 by Dr. Penny Pincher.  All Rights Reserved.  Privacy Policy

Friday, August 28, 2015

Is Cereal a Rip-off?

Is Cereal a Rip-Off?

Today, I will look at the value of a box of cereal.  How much food are you getting?  Corn Pops are very simple, so it is easy to figure out how much corn is in a box of Corn Pops.  Is cereal a rip-off, or a good deal?

 How Much Corn Is in This Box of Cereal?
How Much Corn Is in This Box of Cereal?
Image Source: Dr. Penny Pincher

Corn Pops Really Are Popped!

I made an interesting discovery yesterday while eating breakfast cereal with my kids.  I did a little research, which involved reading the back of a Kellogg's Corn Pops box.  Did you know Corn Pops are actually "popped" corn?  I always thought that corn pops was made from corn flour and shaped through extrusion or something like that.

If you look closely at the corn pops, it make sense that they are puffed up corn kernels.  The back of the box says the corn kernels are cracked in half and then "popped".  Then some sugar is added, of course.

Corn Pops are "popped" corn!
Image Source: Dr. Penny Pincher

Eating something that is literally a whole grain seems pretty healthy, and the fact that Corn Pops are sweetened using sugar rather than high fructose corn syrup seems like a good thing.

How Much Corn Is In A Box of Corn Pops?

Since I am a Penny Pincher, an obvious question comes to mind:  Are Corn Pops a good deal?  People often complain about the high cost of cereal.  Since Corn Pops are simply made from corn, it will be pretty easy to check the cost for the main ingredient in this cereal

It Is Easy to See That Corn Pops Are Puffed Up Corn
Image Source: Dr. Penny Pincher

You can get a 12.5 oz box of Corn Pops for $2.33:  Corn Pops Cereal, 12.5 Ounce

Being from Iowa, I know that corn is selling for about $4 per bushel.  So how big is a bushel?  A bushel is 2150.42 cubic inches or 35.24 liters.  That is a lot of corn for only $4!

My 12.5 oz box of Corn Pops measures 7 7/8 inches wide by 12 3/16 inches high by 2 5/16 inches deep.  This works out to a volume of  221.95 cubic inches.  I'll be generous and assume that the entire volume of the box is filled with Corn Pops, even thought there is some packing inefficiency.

So even before considering that the Corn Pops cereal is puffed up, the cost of corn to fill a box of cereal would be $4 x (221.95 / 2150.42) = 41.3 cents.

I would estimate the the Corn Pops are increased in volume by at least a factor of 2 after they are "popped".  Since less corn is required, this would bring the cost of the corn to make a $2.33 box of Corn Pops down to only 20 cents!

Based on this, it is clear that cereal has a pretty significant mark-up.  I understand that processing the corn and sugar into cereal, packaging it, and transporting it costs money and this cost is reflected in the price.  But a mark-up of about 10x does seem pretty steep.

On the other hand, paying $2.33 for a relatively healthy box of cereal seems like a pretty good deal compared with other food that you could buy.  So is cereal a rip-off?  I'm going to strike a compromise:  I'll keep buying Corn Pops, but I'll complain about how expensive they are!


Copyright © 2015 by Dr. Penny Pincher.  All Rights Reserved.  Privacy Policy

Sunday, April 12, 2015

Rust Converter- Turn Rusty Metal into Primer

Rust Converter- Restore Rusty Items

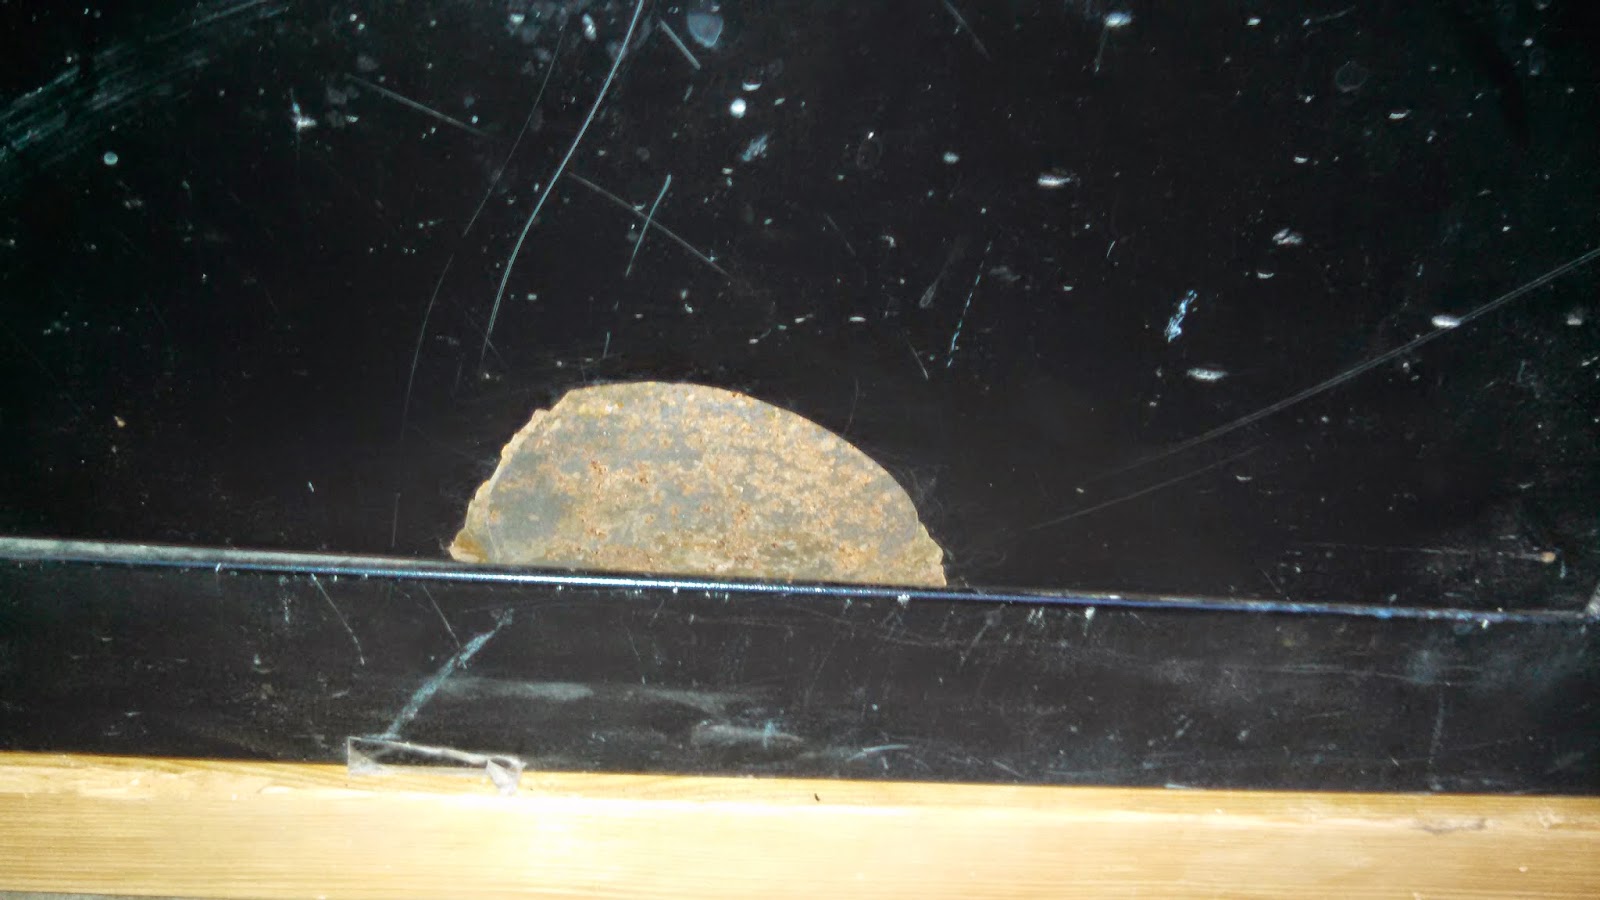
I have always been interested in rust converter.  You can put rust converter on a rusty metal surface and it forms a black protective coat, ready for painting.  Rust converter works using a chemical reaction with tannic acid which converts iron oxide into black colored ferric tannate, which is much more stable than rust.  I like that rust converter chemically reacts with the rust to convert it to something else.  I like the idea of changing the rust into something else instead of just painting over it and watching it rust through again later.

My son's car has some rust coming through at the bottom.  Conveniently, his car is black, so the black ferric tannate will almost match his car's color.  I also have a black metal cabinet in my shop that has a rusty spot about 1 inch tall by 2 inches wide where the paint chipped off.  I'll try the rust converter on the metal cabinet first before we try it on my son's car.

Before Rust Converter


Rusty Metal Surface- Before Rust Converter
Image Source: Dr. Penny Pincher

As you can see, there is a rusty spot on my metal cabinet.  This is a great place to try out the rust converter.

Permatex Rust Converter
Image Source: Dr. Penny Pincher

I went with Permatex Rust Treatment, which is a rust converter.  An 8 oz bottle which can convert 20 square feet sells for about $6.50.  A 16 oz bottle sells for around $10.  You can buy this at a car parts store or on amazon:
Permatex 81773 Rust Treatment , 16 oz.

Applying Rust Converter with Small Paintbrush
Image Source: Dr. Penny Pincher

When applying rust converter, it is important to pour a small amount into a different container.  If you dip your brush into the bottle, the chemical can activate from rust on your brush, ruining the whole bottle of rust converter.  I found a cup in my recycling bin and wiped it out.  I poured a very small amount into the cup since my rusty surface was pretty small.  I used a small paintbrush to apply the rust converter to the rusty surface.

Rust Converter- First Coat, Wet
Image Source: Dr. Penny Pincher

The photo above shows the first coat of rust converter while it is still wet.  It didn't take much at all to cover this small rusty patch.  After 15 minutes, I put on a second coat.  The photo below shows the rusty area with a second coat of rust converter while still wet.


Rust Converter, Second Coat, Wet
Image Source: Dr. Penny Pincher

At this point, I was a bit worried.  I was putting the rust converter on to make the rusty spot less noticeable, but now it was very noticeable since it was white.  I went let the rust converter dry overnight and came back to check out the results the next morning.

After Rust Converter

I was happy to see that the rust converter did turn black as promised.  The rust converter is suitable as a primer.  I think the black color is close enough, and the metal cabinet is in a protected area in my shop, so I don't think I will paint it.  I will just leave the rust converter as the top coat.


After Rust Converter- The Rust is Completely Converted to Black Primer
Image Source: Dr. Penny Pincher


Close-up of Rusty Surface After Rust Converter.  The Rust Has Transformed into a Black Surface.
Close-up of Rusty Surface After Rust Converter.  The Rust Has Transformed into a Black Surface.
Image Source: Dr. Penny Pincher

I will definitely go ahead and use rust converter on my son's car.  I will plan to put paint on over the rust converter since the car will be exposed to water and salt in the winter.

Rust converter is a great way to take care of rusty surfaces, stopping the rust and providing a good primer coat that can be painted.

Permatex 81773 Rust Treatment , 16 oz.

Copyright © 2015 Dr. Penny Pincher.  All Rights Reserved.  Privacy Policy


Saturday, August 30, 2014

Garage Door Threshold Kit- Keep Water Out

Garage Door Threshold Kit

The garage in the house I bought about a month ago showed signs of water coming in- the bottom couple inches of drywall was damp in a few spots.  I removed the damp drywall to prevent mold and mildew.  My next move was to prevent water from coming into the garage again.

A garage door threshold prevents water from coming under your garage door
Image Source: Dr. Penny Pincher

I had a contractor come out to take a look and make recommendations.  The contractor thought the drainage to the garage would keep water from coming in since the garage was elevated relative to the driveway.  He thought that rain could be blowing up against the garage door and coming under the seal along the floor.  He suggested that I install a garage door threshold kit.  This should help with snow coming under the garage door as well.

The Contractor Recommended I Install a Garage Door Threshold to Keep Water Out
Image Source: Dr. Penny Pincher

Finding the Best Garage Door Threshold Kit

I read product reviews and did some research to pick the best garage door threshold kit.  I visited a couple stores to check out kits in stock, but the best kit was available on-line from amazon for under $50.  The problem with most of the kits that I looked at was that the strip of threshold material was not wide enough.  The space from track to track for my double garage was about 16 feet, 2 inches.  Many of the kits have a strip that is only 16 feet wide.  I did not want to leave 2 inches without a threshold.

Garage Door Threshold Kit From M-D Building Products
Image Source: Dr. Penny Pincher

I found a garage door threshold kit from M-D Building Products that has a 20 foot strip and is easy to cut.  Some of the reviews I read suggested using Liquid Nails instead of the silicone adhesive provided in the kit, so I picked up a couple tubes of Liquid Nails for about $2 each and ordered the M-D Building Products threshold kit for under $50.


Installing a Threshold on a Garage Door

The instructions say to use a degreaser on the floor where you are installing the threshold and let it dry overnight.  I swept the floor and then used some Zep purple degreaser and a cheap mop to get the floor really clean.  The next day, I swept the floor again and used a Shop Vac to pick up any dust that was still around that could interfere with the adhesive bonding the threshold strip to the floor.

You'll Need a Utility Knife and a Caulk Gun to Install a Garage Door Threshold
Image Source: Dr. Penny Pincher

Installing the threshold is pretty easy.  After cleaning the concrete, you lay out the threshold on the floor and cut it to length.  I cut mine so it extents fully from one track to the other.  I positioned the strip carefully so that the edge of the bumper on the bottom of the garage door fits nicely against the highest point of the threshold strip.  This required opening and closing the garage door a couple times to get it lined up just right.

Next, I marked the position of the threshold strip with a pencil on both sides.  I flipped the strip out of the way and applied 3 beads of Liquid Nails in the space marked with pencil lines.  Two of the beads were 1/2 inch from the edge, and the third bead was right down the middle. I flipped the threshold strip back into place and carefully positioned it again.  Next I closed the garage door to let the adhesive cure for at least 24 hours.

Use Adhesive to Attach the Threshold Strip to Your Garage Floor
Image Source: Dr. Penny Pincher

Garage Door Threshold Installed To Keep Water Out
Image Source: Dr. Penny Pincher

The Threshold Extends Across the Width of the Garage Door
Image Source: Dr. Penny Pincher

Although not in the instructions, I also used duct tape along the inside edge of the threshold strip to hold it tightly in place while curing.  The edge under the garage door has pressure from the garage door, but the edge of the strip inside needed a bit of pressure to hold it down tightly.

You Can Use Duct Tape to Hold Edges Down While Adhesive is Curing
Image Source: Dr/ Penny Pincher

The adhesive is curing now with the garage door closed- I plan to let it cure for 72 hours just to make sure it is solid.  Check back for a report on how the garage door threshold performs over time.


Copyright © 2014 by Dr. Penny Pincher.  All Rights Reserved.  Privacy Policy

Monday, April 14, 2014

Whole House Air Purifier: New Comfort with HEPA, UV, Ozone, Charcoal, and More

Whole House Air Purifier

Whole House Air Purifier
New Comfort Whole House Air Purifier with 6 Stages of Filtration
Image Source: Dr. Penny Pincher

I have kids and pets in my household, and became interested in an air purifier after a Rainbow Vacuum demonstration.  One of the great things about a Rainbow vacuum cleaner is that it can function as an air purifier as well.  I already had a vacuum cleaner, and I learned that you can get high quality whole house air purifiers for much less than the cost of a Rainbow vacuum- $2,300 for a new one!

I found a great whole house air purifier for under $200.  It has 6 stages of filtration- much more than the 2 stages that a Rainbow vacuum offers.  Unlike the air purifiers that I found at the local Target store, the New Comfort air purifier can handle a much larger space.  The ones at the store could handle a few hundred square feet and cost between $150 to $200.  The New Comfort handles 3,000 square feet.  This will easily cover my entire house.  The unit weighs about 12 pounds and stands about 1 foot tall.  I got the black model, but it is also available with a real wood case or with a clear case.


New Comfort 6 Stage Air Purifier

The New Comfort air purifier has the following stages of filtration to remove dust, allergens, and odors:
  • HEPA filter- removes dust and particulates.  The HEPA filter is washable!
  • UV light- kills germs, bacteria, and viruses
  • Ozone generator- ozone can remove odors, but I don't plan to use it.  More on ozone later...
  • Photo-catalytic filter- removes mold spores, odors, and bacteria
  • Charcoal filter- removes odors
  • Negative Ion filtration- removes pollen and allergens

Whole House Air Purifier- Filter Access
New Comfort Air Purifier- Filters Are Easily Accessible in the Back.
Image Source: Dr. Penny Pincher

The New Comfort air purifier can move a lot of air through these stages of filtration.  The unit has a control knob to control the fan speed from low to high speed.  At the high setting, the New Comfort can circulate enough air to handle a 3,000 square foot space.

Is Ozone Safe in an Air Purifier?

One selling point of the New Comfort air purifier is that it has a knob that allows you to easily turn the ozone production completely off.  I mentioned above that I was not planning to use the ozone generation capability of the air purifier.  Here's why:

Some people claim that ozone is great for removing odors from air and makes air smell fresh and clean like outdoor air.  However, ozone is one of the key components in smog and is known to cause respiratory issues.  Even the product documentation says that ozone is to be used in "uninhabited space".  Ozone has a half life of about 30 minutes, so if you use ozone I would treat it like a hazardous substance- minimize your exposure to it.   Here is a link to a fact sheet produced by the Connecticut Department of Public Health that describes the hazard of using ozone from air purifiers.

The New Comfort air purifier does have a knob to control the ozone generation from low to high and to turn the ozone generation completely off.  If I ever sell my air purifier, having the ozone generation capability will increase its resale value.  I recommend that you do some research before you decide to use ozone generation, starting with the link above.

Whole House Air Purifier- Test Drive

I received my New Comfort 6 stage air purifier today and set it up immediately.  I plan to move it from my upstairs to my downstairs occasionally.  It was easy to set up and get running.  The filters are easily accessible and removable for cleaning or replacement.

The controls are simple:  there is a power switch on the back of the unit, and 2 knobs on the front of the unit.  There is a knob to control ozone- I plan to leave this one in the off position.  The second knob controls the fan speed.  The fan noise increases at higher fan speeds.  I plan to use the low or medium fan speed most of the time.  A green light indicates when the fan is on, and a red light indicates when ozone generation is on.

My house smells fresher already, and I am looking forward to breathing less dust and germs.  If you have issues with odors, dust, or allergies in your house, the New Comfort 6 stage air purifier should make a big improvement in your indoor air quality.


Recommended Reading:
The Sales Pitch: How to Sell Anything is an article that describes the sales pitch for a Rainbow Vacuum in detail.


Copyright © 2014 by Dr. Penny Pincher.  All Rights Reserved.  Privacy Policy

Saturday, March 29, 2014

Rainbow Vacuum: Find the Cheapest Rainbow Vacuum Price

Rainbow Vacuum Price

If you have had the sales pitch from a Rainbow Vacuum distributor and are looking for a cheaper way to get a Rainbow, you are in the right place!

I had the sales pitch last week- it was very impressive.  A young lady came to my house and gave a demo of the Rainbow air purifier and Rainbow vacuum.  The Rainbow uses a water tank as its filter.  You don't need any bags or filters- you just dump the water and replace it with tap water.  The air purifier function seems to work great.  You can run the motor at low speed or high speed, and it does make air smell fresh like air outside after a rain shower.  Scent oils are also provided if you want a scent such as vanilla, cinnamon, or others.  My favorite was the unscented water.

The Rainbow vacuum demonstration was even more impressive.  You can read details of how the Rainbow sales pitch worked in this article.

The clear conclusion was the the Rainbow does a much better job of cleaning than our cheap $80 Hoover upright vacuum.  But the Rainbow costs $2,300.  I liked everything about the Rainbow except the price tag.  I was expecting a "but wait, there's more" sort of offer with a lower price, but it never came.

We were offered a chance to apply for credit and pay $80 a month, but the price for the Rainbow vacuum was still $2,300.  We were also offered a chance to demonstrate Rainbow vacuums and get ours for free if we sold enough.  I didn't like any of these options, but I still liked the Rainbow vacuum.  Is there a cheaper way to get a Rainbow vacuum?

How to Get a Cheap Rainbow Vacuum

The manufacturer of Rainbow, Rexair, appears to only distribute new Rainbows through their distributors.  As you may have gathered, the distribution arrangement is a multi-level marketing organization.  You can make money selling Rainbow vacuums and also by recruiting others to sell Rainbow vacuums and getting a percentage of their sales.  That's all fine as long as I can get a cheap Rainbow...

Fortunately, there are plenty of used Rainbows for sale on eBay and amazon.  The upside of buying a used Rainbow is the low price.  The downside is that you will not get a warranty from the manufacturer and the condition of used vacuums can vary quite a bit.  Another issue is there are several models of used Rainbow vacuums for sale- you'll need to be careful to ensure you get the one you really want.

I said above that used Rainbows do not have a manufacturer's warranty.  You can find some used Rainbows sold by vacuum shops that have a warranty from the shop, which is certainly better than no warranty at all.  Many used vacuums are sold "as is" and some even state "no returns".

How much can you save buying a used Rainbow?  The answer depends on what model you buy, but you can get a used Rainbow with a shop warranty for around $400- a savings of around $2,000!  If you want the cleaning performance of a Rainbow vacuum without the high price, there are some good opportunities to find a used Rainbow that will last for many years.

Rainbow Vacuum Models and Prices

Rainbow E2 E4 Black Model
The fancy new model that we saw at the in-home demonstration is called an E2 E4.  This model has the two speed brushless motor and LED lighting on the water tank and on the power vacuum head.  The 2-speed motor allows the air purifier function to run quietly.  A HEPA filter after the water filter removes small particles.  These are still expensive on eBay, selling for over $1,500.

Rainbow E2 Black Model 12
The Black E2 released in 2011 introduced the 5 wheel dolly design and it also has LED lighing for the water tank.  The 2-speed brushless motor allows the air purifier function to run quietly.  A HEPA filter after the water filter removes small particles.  These are still expensive on eBay, over $1,000.

Rainbow E2 2-speed Models
The 2-speed Rainbow models were first introduced in 2003.  The 2-speed motor allows the air purifier function to run quietly  A HEPA filter after the water filter removes small particles..  The Rainbow 2-speed models have a brushless motor.  There are a couple variants of the Rainbow 2-speed models: the Gold model and the Blue model.  The Gold model was released first and the Blue model (2008-2011) adds some sound absorbing material around the motor to make it quieter.  You can get the Rainbow E2 Gold 2-speed for around $500 on eBay.

Rainbow E Series E2 (1-speed) Model
The E Series was introduced in 1998.  The older E series models of Rainbow vacuums used a 1 speed motor with brushes.  These models do not have a slower- and quieter- speed for air purification.  These Rainbows are either on or off.  This was the model that added the HEPA filter in addition to the water filter.  This is useful for filtering small particles that make it through the water filter.  The Rainbow E series 1 speed models are great vacuum cleaners and sell for around $400 on eBay.

All of the Rainbow E Models above move 80 cubic feet of air per minute and have a HEPA filter in addition to the water filter.

If you are willing to look older models more than 15 years old, you can get a Rainbow vacuum cleaner for under $300.  Here are the older Rainbow Vacuum models:

Rainbow SE / SE PN2 Model
This model added the electrical cord inside the hose to power accessories.  The SE is the first model that can use a RainbowMate, which is a powered upholstery cleaning accessory.

Rainbow D4 Model
The D4 has more power than older models and is considered a reliable vacuum cleaner with relatively simple design.

The D4 and SE Rainbows move 72 cubic feet of air per minute.

Rainbow D3 Model
The D3 was made in the 1980's.  I would be concerned about reliability and availability of replacement parts in a model this old.

The D3 moves air at 67 cubic feet per minute.

Which is the Best Model of Rainbow?

I have decided to look at E2 models.  These all have the HEPA filter added in addition to the water filter, have more power than older models, and are relatively new which should increase their life expectancy.  At first I was considering the 1-speed model since these can be purchased for around $400, but I do like the idea of being able to run the unit quietly as an air purifier.  So now I am focusing on E2 2-speed models.  The 2-speed models feature brushless motors which should last a very long time.


Cheap Rainbow Vacuums on eBay

Start here to find cheap Rainbow Vacuums on eBay:


Cheap Rainbow Vacuums on amazon

Start here to find cheap Rainbow Vacuums on amazon:


Cheap Rainbow Vacuums on craigslist

I did not have much luck finding Rainbow vacuums for sale on craigslist in my area.  There were a couple for sale, but one was $2,100 and the other was $1,400.  Both of these prices were much higher than similar ones on eBay or amazon, and there were only two available for sale on craigslist.


Recommended Reading:
The Sales Pitch: How to Sell Anything is an article that describes the sales pitch for a Rainbow Vacuum in detail.

If you want a great whole house air purifier that is much less expensive than a Rainbow, check out this New Comfort air purifier


Copyright © 2014 by Dr. Penny Pincher.  All Rights Reserved.  Privacy Policy

Wednesday, July 3, 2013

Ceiling Fan Upgrade: Install a Ceiling Fan With Uplight and Remote Control

Upgrade Your Ceiling Fan- Get Uplight and Remote Control


Ceiling fan store display
Ceiling Fan Upgrade Options: Uplight, Downlight, and Remote Control
Image Source: Dr. Penny Pincher

My wife tried to convince me to buy a discount ceiling fan at Lowes and install it at home. There were several display ceiling fans that had been taken down and were lined up resting in shopping carts. The one my wife was interested in was Harbor Breeze Wakefield 52 inch ceiling fan with up lights, down lights, and a variable speed ceiling fan with remote control. Our old ceiling fan was a simple ceiling fan with no lights or remote control. I had several reasonable and rational objections to this plan:

  1. We already had a working ceiling fan, why replace it? OK, the fan we already have doesn’t have lights, but we have lamps in the living room that we can use.
  2. The close-out bargain ceiling fan cost $80, which is a lot more than nothing which is how much not replacing it would cost.
  3. I didn’t want to mess with wiring and installing a new ceiling fan myself.
  4. The bargain ceiling fan was a demo model and not even in its original box- what if parts were missing?
These objections were noted and overruled. The new ceiling fan was purchased and brought home and awaiting installation. On the bright side, we got a fan that originally sold for over $200 for only $80- and it came with a full set of compact fluorescent lights installed. And it had a remote control. I didn’t really even notice the remote control until after we bought it.


Ceiling fan installed
Harbor Breeze Wakefield Ceiling Fan With Uplight and Remote Control
Image Source: Dr. Penny Pincher

Ceiling Fan Installation Steps

The installation process started with about an hour of complaining. I then got out to work following these steps to remove the old ceiling fan and install the new one:
  1. Read ceiling fan installation instructions
  2. Check to see that all parts needed are present
  3. Switch off power to the ceiling fan at circuit breaker. Check to make sure the power to the old ceiling fan is off after switching off the circuit breaker. If the ceiling fan still turns, try a different breaker…
  4. Get a step ladder, set it up under the old ceiling fan
  5. Remove the old ceiling fan. There is usually a mounting screw that must be removed. Sometimes it is hidden under trim that snaps in place. Newer ceiling fans can hang in place while you work on the wiring. Let the fan hang and disconnect the wiring. Since I’m paranoid, I took a picture of the connections of the wiring to the old fan before disconnecting anything- just in case. Take the old fan down and set aside.
  6. Install the new ceiling fan. Hang it in place and connect the wiring with wire nuts. Make sure the wire nuts are nice and tight and that the correct wires are connected together. It’s usually pretty obvious like white wire connected to white wire, black wire connected to black wire, etc. Now raise the new ceiling into position and install the mounting screw and trim.
  7. Now the moment of truth- switch the breaker on and try out your new ceiling fan.

Close-up of ceiling fan remote control
Ceiling Fan remote control for fan speed, uplight, and downlight
Image Source: Dr. Penny Pincher

Easy Project: Upgrading a Ceiling Fan

Upgrading a ceiling fan is an easy project- this took me about 45 minutes to remove the old ceiling fan and install the new ceiling fan. If you have a properly installed existing ceiling fan, it is really easy to install a replacement ceiling fan.

If you want to install a ceiling fan in a place that does not have an existing ceiling fan, you may need to tear into the ceiling to install a junction box that can carry the weight of a ceiling fan- a much bigger project and you may want to consider hiring a professional contractor.


Ceiling fan with uplight installed
A ceiling fan uplight provides perfect lighting for watching TV
Image Source: Dr. Penny Pincher


Ceiling Fan Upgrade- Good Value!

If you don’t have a remote control ceiling fan with up-lights, you don’t know what you’re missing!
The up-light is perfect for watching TV. The light reflects off of the ceiling and provides a nice low level illumination.  The fan also has a regular light on the bottom, a down-light I guess, which provides more light if you want that. The ceiling fan also works well, and all of the functions are controlled by a remote control. I use this all the time to control the lights and ceiling fan speed without getting up.

One of the first things to do when installing a new ceiling fan is to make sure it rotates in the correct direction. Most fans are reversible and have clockwise and counterclockwise rotation directions for summer and winter. You want your ceiling fan to make you feel cooler in summer and warmer in winter by moving air in the proper direction. The Harbor Breeze has no obvious way to reverse the ceiling fan direction. It took a bit of research to discover the proper ceiling fan rotation direction for summer and winter and how to change the ceiling fan rotation direction on a ceiling fan without a switch.

I use the features of the new fan every day, and a fancy fan like this probably increases the resale value of my house. We use the uplight every evening, occasionally use the downlight, and use the fan most days. It is really handy to be able to control the lights and fan speed without getting up. I'm glad we upgraded our ceiling fan, this was a project well worth doing.


Sunday, June 16, 2013

Dishwasher Detergent Options- Best Automatic Dishwasher Tablets

Automatic Dishwasher Detergent Options

Automatic dishwasher detergent tablets contain soap and other cleaning chemicals and are placed in your dishwasher soap compartment.  The dishwasher tablets, also known as dishwasher tabs, gel pacs, or capsules, are more convenient and less messy than filling the detergent compartment with liquid dishwasher detergent or powdered dishwasher detergent.  How much does dishwasher detergent cost, and which dishwasher tablets are the best at getting dishes clean in your dishwasher?

Dishwasher Tablets and Gel Pacs

Dishwasher tabs and gel pacs are a convenient way to load your dishwasher with soap.  Dishwasher tablets are made of a solid detergent material that dissolves during the dishwasher cycle.  Dishwasher gel pacs have a soft wall containing liquid soap that dissolves during the dishwasher cycle, releasing the soap.  Some gel pacs contain multiple compartments of cleaning products that are released at different times during the dishwashing cycle.


Shows clear pac containing gel and powdered dishwasher detergent
Cascade Platinum Dishwasher Gel Pac- You can see gel and powder inside the pac
Image Source: Dr. Penny Pincher

Dishwasher Tablet Cost

Dishwasher tablets and gel pacs cost about 25 cents each depending on the brand and quantity that you buy.  Since a load of dishes takes one tablet or pac, the cost of detergent for a load of dishes is about 25 cents per load for tablets or gel pacs.

Dishwasher Liquid Cost

Dishwasher liquid or gel comes in jugs and is poured into the detergent dispenser of your dishwasher.  The cost is about 9 cents per ounce depending on the brand and size of container.  Dishwasher detergent capacity is typically 2.5 fluid ounces.   This brings the cost for running the dishwasher to about 22 cents per load.

Powdered Dishwasher Soap Cost

Powdered detergent costs slightly less than dishwasher liquid or gel, about 7% less by some estimates.  The cost of powdered dishwasher detergent is about 20 cents per load depending on the brand and size of container that you buy.  Dishwasher powder detergent is the lowest cost automatic dishwasher detergent solution.  However, dishwasher powder is messier and more difficult to pour into the detergent dispenser.  Also, the solids in the powder may not dissolve as well as gel, resulting in less effective cleaning of your dishes.

Cost of Hand Washing Dishes

The cheapest way to wash dishes is in the sink, washing them manually.  The cost of dish soap is only a few cents per load.  You can buy a 24 oz bottle of name brand dish soap for about $6 that will wash many loads of dishes.  If you use 1/2 oz of dish soap, your cost is about 12 cents per load, where a load in this case is the capacity of an automatic dishwasher which is several sinks worth of hand wash dishes.  If you wash dishes like me, you can use the 1/2 oz of dish soap to wash a few sink fulls before adding more.

Another cost of doing dishes in the sink by hand is time and effort.  Washing dishes by hand is labor intensive and time intensive.  Using an automatic dishwasher is much more convenient.  A dishwasher is a robot that washes dishes for you so you can do other things.  This is worth spending a few extra cents on soap if you have an automatic dishwasher available.

The Best Dishwasher Tablets: Finish Powerball vs Cascade Platinum

I prefer the tablet or gel pac format- this is very convenient and seems to do the best job at getting dishes clean.  We normally use Quantum Finish Powerballs.  We ran out of Finish Powerballs and bought the only gel pacs that our neighborhood grocery store had to offer- Cascade Platinum.  Which is the better dishwasher detergent product: Finish Powerball or Cascade Platinum?


Package of Finish Powerball next to package of Cascade Platinum dishwasher pacs
Quantum Finish Powerball vs Cascade Platinum Dishwasher Gel Pac
Image Source: Dr. Penny Pincher

The best dishwasher tablet:  Finish Powerball produced noticeably cleaner dishes.  Cascade Platinum left flecks on glasses and silverware. The water at our house goes through a water softener, but the water is still hard water with high mineral content, which may have affected the cleaning performance.  Finish Powerball was much more effective than Cascade Platinum- we will give away the rest of the bag of Cascade gel pacs since we like Finish Powerball so much better!


Copyright © 2013 by Dr. Penny Pincher.  All Rights Reserved.  Privacy Policy


Friday, May 3, 2013

ElliptiGO vs StreetStrider- Find the Best Elliptical Bike

Elliptical Exercise Machines Let You Train and Ride

Three ElliptiGO elliptical cycles on a sidewalk
ElliptiGO- hybrid of bicycle and elliptical trainer
Image Source: Dr. Penny Pincher


One problem with exercise equipment is that people quickly lose interest.  Workouts can become boring.  Treadmill machines often include a video screen so that you can watch TV or even simulated scenery as you exercise to help hold your interest.  Some stationary bikes include a video screen and resistance control to simulate riding a specific route, making the workout more interesting.  ElliptiGO and StreetStrider take your workout to an entirely new place- moving down the street on an elliptical exerciser.  Which is the best elliptical cycle?

ElliptiGO Elliptical Bicycle

ElliptiGO is an elliptical exercise machine with wheels that actually moves while you are exercising.   Like an elliptical exerciser, you use the ElliptiGO in an upright, standing position.  Riding around on an ElliptiGO would attract some attention- this is an unusual looking machine.  It sort of reminds me of an elongated Segway HT with elliptical pedals.

ElliptiGO is a cross between bicycle and elliptical exerciser.  It has brakes activated by hand levers similar to brakes on a mountain bike.  ElliptiGO uses handle bars for steering and has gears to make climbing hills easier.  You can get 3, 8, or 11 speeds depending on the ElliptiGO model you choose.  If you plan to ride on hills, the 8 and 11 speed models are recommended.

ElliptiGO is designed to provides a serious cardiovascular workout as well as an interesting riding experience.  Most people interested in ElliptiGO are focused on getting intense exercise and finding an alternative to running.  Since ElliptiGO works like an elliptical exercise machine, it is easier on feet, knees, and hips than running.

Since ElliptiGO has 2 wheels, you'll need to balance it, similar to riding a bicycle or scooter.  The standing position while riding an ElliptiGO allows you to use your whole body to propel you up hills- sort of like standing up while riding a bicycle to climb a steep hill.  Weighing in at about 40 pounds, ElliptiGO is fairly heavy compared with road bikes.  ElliptiGO can reach speeds of 15-25 mph.

You can use ElliptiGO with a stationary trainer- this allows you to use ElliptiGO indoors during winter months as a traditional elliptical trainer.

ElliptiGO models are priced ranging from about $1799 - $3000, depending on model.
ElliptiGO models include the 11R, 8C, and 3C.
Manufacturer website: http://www.elliptigo.com/

StreetStrider Elliptical Cycle


Red StreetStrider on a stand in a living room with woman exercising
StreetStrider- hybrid of cross-country ski machine and tricycle
Image Courtesy of FitnessFreakLA by CC-SA3.0

StreetStrider provides a cross country ski machine workout on a stand-up trike.  StreetStrider has 2 wheels in front and one rear wheel.  The 3 wheel design virtually eliminates the need to balance, and you can come to a complete stop without putting your feet down.

Unlike ElliptiGO, you pump your arms in addition to your legs to propel StreetStrider.  But how do you steer StreetStrider?  The answer is lean to steer.  You shift your body weight to the left or right to make StreetStrider turn.  That way you can keep pumping your arms, even in turns.


StreetStrider weighs about 50 pounds, about 10 pounds more than ElliptiGO.  Gear options include a 3 speed model (Sprinter 3r) and an 8 speed model (Summit 8r).  Like ElliptiGO, you can use StreetStrider with a stationary trainer for indoor workouts as shown in the picture above.


The StreetStrider 8 speed model is priced starting at about $1800.
Manufacturer website:  http://www.streetstrider.com/


A Zike step cycle looks like an interesting low-cost alternative to ElliptiGO or StreetStrider at around $500:

ElliptiGO vs StreerStrider: Which is the Best Elliptical Bike?
  • These elliptical exercise cycles both look like a lot of fun and would be great for people who are looking for lower impact exercise than running
  • If you are looking for an alternative to riding a bicycle for exercise, elliptical cycles are worth considering:
    • A bicycle requires a seated, hunched over posture  
    • Recumbent bikes or recumbent trikes require a reclined posture  
    • Elliptical exercise cycles use a standing up posture
  • With a stationary trainer, these can be used year-round indoors or outdoors.
  • As with any exercise equipment the key question is- would you really use it?  The ability to ride it like a bicycle seems like a nice feature.
  • These cycles are fairly expensive.  You could get really lucky and find one of these at a garage sale cheap.
  • You could check craigslist for a used one.  These are fairly unique, so the market for used ones may be limited, creating an opportunity to drive a bargain (maybe).
  • Look for the best elliptical bike deals on eBay:


Recommended Reading
Copyright © 2013 Dr. Penny Pincher.  All Rights Reserved.  Privacy Policy


Sunday, March 17, 2013

Perfect Multi-gym: Pull-up bar and more


Wanted: Pull-up bar that doesn't damage door frame or trim

Yesterday, my son reminded me that he wanted me to install a pull-up bar so he could do pull-ups.  I want to encourage him to exercise, and I would like to do pull-ups as well, so I wanted to get something right away.  When we lived on the farm, I made a pull-up bar in the barn using construction materials including a 4 foot section of steel pipe, a couple pipe hangers, and some long lag bolts.  The materials for this project cost about $15.  The steel pipe worked fine, but it would rotate in the hangers and it was a bit hard on hands- wearing gloves when doing pull-ups on the steel pipe was a good idea.

This pull-up bar needs to be installed inside the house.  I decided to look at purpose-made exercise equipment this time.  I knew I might pay a bit more than the $15 I spent hanging the steel pipe, but I wanted something that would be easy to install without damaging the house, and that would make it as easy as possible to do pull-ups.

Internet searching revealed a number of options.  The mounting of the pull-up bar was a key issue for me, I did not want something that required a lot of drilling and putting screws into a doorway.  I also decided to mount the pull-up bar in an unfinished basement.  There are stud walls with doorways, but these measure 34 1/8  inches since there is no door or door frame installed.  Many of the pull-up bars requires a narrower opening.

Perfect Multi-gym pull-up bar

I checked the shelf at the local Walmart store and found one that would fit a doorway up to 35 inches wide. It was the Perfect Multi-gym for $29.77.  This was a bit more than I was hoping to pay, but looked like a nice piece of equipment.  This unit installs without any screws or drilling in the doorway.  You can adjust the pull-up bar to fit the dimensions of your doorway, and it uses the trim of the doorway to keep it in place. Most of the weight presses against the door frame, not pulling down on the trim.


Perfect Multi-gym pull-up bar in box
Perfect Multi-gym for pull-ups and more
Image Source: Dr. Penny Pincher


The Perfect Multi-gym has several places covered with foam that can be used for pull-ups to exercise different muscle groups.  The unit can also be easily removed from the doorway to use for push-ups, sit-ups, and other exercises.

Since my door frame is unfinished, it does not have trim.  I used 6 nails to hang a piece of 1x2 to act as the trim until we install a door.  The pull-up bar also comes with a safety clip that provides a catch to keep the pull-up bar from coming down from the doorway, which was easily installed behind the 1x2 trim.


Perfect pull-up bar installed in door frame, view from front
Perfect Multi-gym pull-up bar installed in door frame
Image Source: Dr. Penny Pincher


Perfect pull-up bar installed, view from back
Perfect Multi-gym pull-up bar installed in door frame uses trim for support
Image Source: Dr. Penny Pincher


The Perfect Pull-up Bar

The Perfect Multi-gym will make doing pull-ups easy.  The novelty factor is still high- I have done quite a few pull-ups already today, and I think my kids will use it a lot as well.  I installed it in a doorway so that the pull-up bar is a couple inches higher than the tallest person, so we can leave it in place all the time.  It is comfortable to use and seems well made.  The instructions were easy to follow, and I like that installing the unit does not require screwing or drilling into a door frame.


Recommended reading:


Penny Pincher Journal
Copyright © 2013 Dr. Penny Pincher.  All Rights Reserved.  Privacy Policy

Recent Penny Pincher Posts