Saturday, December 9, 2017

The $4.11 Turkey (15 lbs)

The 411 on Bargain Turkey


Bargain Turkey after Thanksgiving!

The Saturday after Thanksgiving I was at the grocery store with Mrs. Penny Pincher to pick up a few things.  As I walked the aisles, I wondered if there would be an overstock of turkeys that could be had at bargain prices.  I figured that the store would not want to risk running out of turkeys before Thanksgiving and would err on the side of having too many.

I learned I was right about my suspicions of a turkey overstock when I came across a 15 pound turkey on sale for $4.11.  It was in a refrigerator case, so I wouldn't even need to mess around with thawing it out.  I could just pop it in the oven and gets 15 pounds of really easy and really cheap food.  Apparently someone had ordered this one (it had a name written on a tag), but had not picked it up.  There were 5 or 6 other defrosted turkeys of similar size and price.

Next year, I'll plan to go bargain hunting for defrosted turkeys on the day after Thanksgiving.  We ended up eating the turkey for several days, including lots of slices of turkey meat and even made a turkey casserole.

I wonder if I could pick up a cheap ham after Christmas?

Project time: Less than one hour.
Project cost: About $4.11.
Savings: Probably about $15 vs. buying a turkey at full price.  Having cheap food around instead of buying other things for lunch and dinner for a few days probably saved even more.


Copyright © 2017 by Dr. Penny Pincher.  All Rights Reserved.  Privacy Policy


Sunday, December 3, 2017

I Repaired My Car Window with Duct Tape (and It's OK)

I Repaired My Car Window with Duct Tape (and It's OK)


Broken car window held closed with duct tape

A funny thing happened last summer.  The rear driver side window in my car wouldn't roll up.  It was having some intermittent problems with the electric motor going up and down and would sometimes get stuck for a few minutes until it would move again.  Finally it stopped moving altogether.  Pushing the window up into the closed position didn't work.  The window would just slide about half way open and would not stay closed.

It would have been more convenient if the window would have stopped working in the closed position instead of the open position.  If the window had stuck in the closed position, I could have ignored it.  But with the window open, rain would come in and cause further damage.  Plus wind noise at highway speed is pretty loud with the window half way down all the time.  Clearly I would need to do something about the window not being able to close.

I thought about taking my car in to a shop to have the window repaired, but I have heard horror stories about bills of hundreds of dollars for repairing electric car windows.  Coming up with that kind of money was not going to work.  But I had duct tape.  Not every problem can be solved with duct tape - or at least that is what my wife tells me.  But I decided this was just the kind of problem that called for duct tape.

I didn't want my car to look too junky with duct tape all over since I drive it to work.  So I decided to tape the window closed from the inside with duct tape, and trim the tape neatly to make it less obvious that the window is taped closed.

Minimizing the amount of duct tape is a security enhancement too, since the window could be pried open from outside, and using a lot of duct tape would call attention to that fact.  From outside the car, the small amount of duct tape is barely visible.

Duct tape was a better solution than glue for keeping the window closed since the duct tape can be removed easily.  If I find either the money to have the window repaired, or the time to figure out how to repair it myself with salvaged parts, I will be able to remove the duct tape fairly easily.

I added a finishing touch to the project by placing some painter's tape over the window switch in the back seat.  This serves as a reminder not to try to move the window with the switch since it is taped closed.

Painter's tape over window switch

The duct tape has been holding for over 6 months now without any problems.  As you can see in the first photo, I used some silver duct tape and some extra-strong "gorilla" black duct tape to keep the window closed.

Project time: Less than one hour.
Project cost: About $1.
Savings: Probably a few hundred dollars by using duct tape instead of repairing the electric window.


Copyright © 2017 by Dr. Penny Pincher.  All Rights Reserved.  Privacy Policy

Sunday, November 26, 2017

Welcome to Penny Pincher Journal!

Welcome to Penny Pincher Journal!

Dr. Penny Pincher
 Dr. Penny Pincher 

Do you wish you had more money?  The easiest way to get more money is to spend less!

It's a vicious cycle: you spend more money to buy more stuff, only to find that you are still not satisfied.  All of that spending in pursuit of happiness is keeping you in debt and limiting your lifestyle options.  I have found that there will always be at least one more thing you want to buy in order to be happy...  The way to break this cycle and find happiness is to spend less money, not more!

If you are looking for easy ways to spend less money, you are in the right place!  Penny Pincher Journal is a blog loaded with FREE articles and advice to help you spend less money and enjoy life more.  You can even get a free eBook here with 101 tips to help you spend less money.

Take a look around this site and get free money-saving advice and tips from Dr. Penny Pincher.  Stop back soon- new articles and blog posts are added frequently.

Free Offers- Sign up Now!


Enter your e-mail address below and you'll receive my eBook Pinch Like You Mean It with 101 ways to save money- a $3.99 value.  As an added bonus, you will receive my exclusive report Uncommon Cents: Weird Way to Save A LOT of Money.  Plus you will receive occasional bonus tips on saving money via email.

Sign up here to get the free stuff:

* indicates required


Your e-mail address will not be shared with anyone else, and you can unsubscribe at any time. 
Finance Blogs


Popular Articles

The Free Dish Network Plan
I have saved a ton of money on TV, you can save money too.


Retire Outrageously Early- 25 Is the New 65
This young man retired in his 20's- how did he do that?


Sharpen Disposable Razor Blades and Save Money
Sharpen disposable razor blades and save money...


How to get coffee for half-price every day: and no, this is not about making your own coffee at home...


How to Survive Store Crowds at Doorbusters
You can save money at doorbusters, here are some tips to get the deals and survive the experience...


Why is Cake so Expensive!?
Why is cake so expensive?
A box of cake mix costs about $1.25, yet a decorated cake costs around $20- why is cake so expensive?


Get the Free Book!  Sign Up Now


Free eBook: 101 Tips to Spend Less Money
Free eBook: 101 Tips to Save Money

Enter your e-mail address below and we'll send you the free eBook Pinch Like You Mean It: 101 Ways To Save Money Now, a $3.99 value.  You'll also receive occasional bonus tips on saving money from Penny Pincher Journal.  Don't worry- we won't sell or share your e-mail address!


* indicates required


The popular articles above are just a small sample of what you can find FREE here on Penny Pincher Journal.  The more you explore this site, the more ways you can find to save money every day.


Copyright © 2017 Dr. Penny Pincher.  All Rights Reserved.  Privacy Policy

How to Return an Item Without a Receipt, and Without Original Packaging


Return Without Receipt, and Without the Box!


Deboot, verb:  To return unneeded boots and get much-needed cash.  In extreme cases, this can be done even after the box is recycled, and without a receipt.

How to do a return without a receipt, and without the box


The other day, my wife showed me some boots she had picked up at Kohl's sometime within the past few weeks.  She mentioned that they pinched her feet and she wanted to return them.

On one hand, this was great news.  She got the fun of shopping and getting new boots, and it wasn't going to cost anything.  We could get the money back, plus we would regain valuable closet space.

But the bad news is that I remembered recycling the box.  I usually save boxes for a few weeks after a purchase in case we need to return an item.  But I knew this one was long gone.

"Do you have the receipt?" I asked.  Mrs. Penny Pincher said it was probably in her purse.  After a thorough search of her purse, her car, and the recycling bin, I concluded that the receipt was also gone.

So we had some unwanted boots with no receipt and no box.  But we knew what store they were from, and she knew she used one of the credit cards in her purse to buy them.  I was willing to give returning them a try even though I knew it would be a challenge.

I found a Kohl's bag to carry the boots into the store.  It wasn't as good as having the box, but at least it conveyed that the boots were bought from that store.  When I reached the front of the return line, I explained that I needed to do a return without a receipt.  They said they could look up the purchase if I had the credit card.

I started going through my wife's collection of credit cards from her purse.  We checked her Kohl's card, and it wasn't that one.  We tried a U. S. Bank card, and it wasn't that one.  We tried looking up her Kohl's reward card number, but this also failed.  We tried another U. S. Bank card and it was a winner!

The entire process of doing a return without a receipt and without the original packaging took only a few minutes.  It was well worth it to get over $33 back and avoid wasting a pair of boots that were not needed.

Here are the highlights of how to do a return with no receipt and without original packaging:

  • Make sure the item you are returning is clean and is in new condition
  • Take the item back to the store and ask to return it
  • Request to search for the purchase on a credit card transaction
  • Be friendly to the store employees in the return line, it might take some patience to find the purchase on a credit card
  • Bring all of the credit cards with you that could have been used to make the purchase
  • Keep track of which cards you have checked so you don't end up checking the same card twice


What if you paid cash instead of using a credit card?  Doing a return without a receipt is easier if you used a credit card since there is a record of the transaction that the store can look up.  You might still be able to return the item even if there is no record of the purchase, but you might get store credit instead of a refund.  Also, you might get the lowest sale price for the item instead of the price you paid.


Copyright © 2017 by Dr. Penny Pincher.  All Rights Reserved.  Privacy Policy


Saturday, July 22, 2017

DIY Rear View Mirror Replacement


Today as my son was pulling out of the driveway, his rear view mirror fell off!


My Rear View Mirror Fell Off!  How Can I Fix It?
My Rear View Mirror Fell Off!  How Can I Fix It?


This is the same 13 year old Toyota Matrix that just underwent a door check strap replacement (details on how I saved $160 by doing this repair myself are in my post from last week).

So now, I had an opportunity to learn how to replace a rear view mirror that has fallen off.

The key to success is to remove the "button" from the rear view mirror assembly.  The "button" is a flat metal part that is attached with adhesive to the windshield.

The general procedure to re-attach a rear view mirror is:
  1. Remove the "button" from the mirror assembly.
  2. Using a razor blade, carefully remove the old adhesive from the windshield and the "button"
  3. Clean the windshield where the "button" will be attached
  4. Apply the activator to both the windshield and "button" and wait 5 minutes
  5. Apply a drop of adhesive to the "button" and press it in place against the windshield for 1 minute
  6. Wait at least 15 minutes for the adhesive to cure, then reattach the rear view mirror


Here are the tools and materials you'll need:
  • Screw driver to remove rear view mirror from "button".  Mine had a screw that took a star driver to remove.
  • Razor blade to remove old adhesive from "button" and windshield
  • Glass cleaner and paper towel or rag to clean windshield
  • Gloves to wear when applying the adhesive
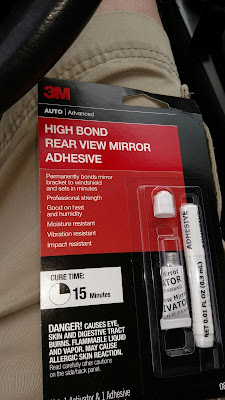
  • And of course you'll need rear view mirror adhesive, I used a product from 3M that cost under $10, see picture below.


Rear View Mirror Adhesive
You can get rear view mirror adhesive at a car parts store or order it from Amazon.

3M 08749 High Bond Rearview Mirror Adhesive - 0.02 fl. oz.

The set includes a tube of activator and a tube of adhesive that are designed to attach the rear view mirror to the windshield.


Here is what the rear view mirror "button" looks like:

Rear View Mirror "Button"

The button is a flat piece of metal that is glued on to the windshield.  The rear view mirror assembly has an opening that fits the shape of the button.  It very difficult to re-attach the rear view mirror without removing the button.  You'll want to remove the button, re-attach that to the windshield, and then hang the rear view mirror assembly back in place.


Rear View Mirror Button Back In Place
The photo above shows the rear view mirror button back in place after scraping the old adhesive off, cleaning the windshield, applying activator, and applying adhesive and pressing the button back in place.

Next, wait at least 15 minutes for the adhesive to cure.

Finally, hang the rear view mirror assembly in place on the button and attach it with a set screw to hold it in place.

Hanging the Rear View Mirror on the Button

With the rear view mirror attached again, the car was ready to drive.  This repair took about 30 minutes and was pretty easy to do.  I don't know how much a body shop would charge for this, but I would guess around $50.

Stay tuned to see what breaks next on the old Toyota Matrix...


Copyright © 2017 by Dr. Penny Pincher.  All Rights Reserved.  Privacy Policy

Saturday, July 15, 2017

Saving $160 on a Simple Car Repair

How I Saved $160:  DIY Replacement Car Door Stop Strap


The Broken Car Door Check Strap...

The other day, we were saying goodbye to my teenage son in the driveway.  His suitcases were in the back, and he was heading out on his first real road trip, a 100 mile drive to a summer camp.  As he was closing his car door, something snapped on the driver's side of the 13 year old Toyota Matrix.

A small hinge in the middle of his car door had broken in half.  The door would now swing wide open, more than 90 degrees, but the door still seemed to close securely.  We didn't investigate this much at the time since he had to go to make it to his summer camp opening events on time.

After he returned, I took the Toyota with the broken door check strap to the shop and asked if they could repair it.  They could, but the cost would be $225.

I asked if they meant $2.25, but no-- the estimate was actually for over $200 to replace the little hinge in the middle of the door.  They said the part is specific to this model of car and is quite expensive.  This seemed like way too much, so I declined.

I checked out some videos on YouTube on how to replace this part.  It was held in place by 3 bolts, one in the frame of the door, and 2 more to hold the other side of the hinge in the door itself.  The only tricky part is that you have to remove a couple of screws and pop the door panel off of the metal part of the door.  I always worry that I won't be able to put something like this back together, but I decided that it would be worth the trouble if I could save more than about $50 by doing the repair myself.

My next move was to look for this part myself.  I could get a brand new part for this model of car for $90 from a car parts store.  This is still expensive, but better than $225.

Next, I decided to look at junk yards for a salvaged part.  I didn't think the door check strap needed to be brand new since no other part on the 13 year old car was new.  Plus, I had never seen this part break on a car before, so I thought a used one would be fine if the price was better.

I started calling junk yards and salvage yards.  The first two I called did not have this part.  It was often included with the door, and I didn't want to buy an entire door assembly to get the part.  I tried a third junk yard-- they didn't have the part, but could get it the next day.  The price:  $55.  I placed the order.

I assembled the tools I needed for the job: a 10mm socket wrench, a Phillips screwdriver, a small flat blade screwdriver to remove a screw cover, and a pry bar.  The instructions called for a plastic pry bar to carefully remove the door panel, but I used a small metal pry bar that I already had and wrapped a rag around it to protect the plastic door panel.

As with most projects, the disassembly part was quick and easy.  Installing the new door stop hinge was easy too.  But getting the door panel attached straight and tight when putting everything back together was a little tricky.  Luckily Mrs. Penny Pincher walked by at the right time and helped get the door panel lined up and snapped in nice and tight, just like new!  Tip: line up the door panel at the top, along the window first, and then work down from there.

Here's how much I saved by installing the door check strap myself:

Car shop estimate: $225
Salvaged part cost: $60 (including tax, etc)
Gas to drive to get the salvaged part: $5

Savings: $225 - $60 - $5 = $160

It took about an hour to track down and drive to pick up the salvaged part, and about 30 minutes to install it.  So my hourly rate of pay for doing this project was over $100 per hour!

Even if you don't have any of the tools for this repair and had to buy them, it would still be worth doing this project yourself.  I'm glad I gave this a try considering how much money I saved.


Copyright © 2017 by Dr. Penny Pincher.  All Rights Reserved.  Privacy Policy


Wednesday, May 17, 2017

Why I Got a Cordless Electric Lawn Mower

Oh Snap!


I Replaced My Broken Gas Mower With A Cordless Electric Mower!

My wife sent me out to use the push mower to mow a small part of our yard that is on the side of the hill and is a bit tricky to mow with the riding mower.  This should have been a pretty easy assignment, but when I pulled the cord to start the mower.... SNAP!  I knew this was bad news, because the starter cord broke last year too.  I ended up buying a new starter coil mechanism for about $40 dollars and installed it.  Since the mower is about 10 years old, it was a tough decision to put $40 into it, but I figured this was cheaper than replacing it.

When the mower broke again, I had the opportunity to revisit this decision.  I decided not to put any more money into this mower.  It still works fine (except for the starter cord), but it was showing its age.  The wheels are worn down.  The plastic deflector for grass coming out has been broken for years and has been re-attached using some wire.  The blade is dull and should be sharpened or replaced..

So I loaded up the old mower and took it to the landfill for a disposal fee of $12.50.  That part was pretty easy.  Now for the hard part- getting another mower.

Why I Got An Electric Lawn Mower

When I had a small yard, I considered getting a plug-in electric mower.  With a small yard, it wouldn't be too hard to plug in an extension cord and reach the entire yard.  I like the idea on an electric mower because that means no gas, no oil, no spark plugs, and most importantly... NO STARTER CORD!

But my yard now is large and ranges from prairie to forested areas beyond the reach of an extension cord.  I mow almost all of it with a nice riding mower equipped with snow chains to help with traction in hilly areas.  The push mower is needed only for trimming and mowing some tight spots that I can't reach with the riding mower.

I decided to get a cordless electric push mower to replace the old gas mower.


There are some full-sized 22 inch cordless electric mowers, but these run around $500.  I found a slightly smaller 16" model from Black and Decker for about $250.  Actually, the small size is handy for reaching the tighter spaces I want to mow with a push mower anyway.

The first problem I had with the Black and Decker is the bag.  This mower is designed to collect grass clippings in a bag.  This is handy sometimes, but emptying the bag is tedious.  I used a wire clothes hanger to hold the rear door open a few inches.  I turned this mower into a rear-discharge mower, and it works pretty well.  I plan to use the bag sometimes, but most of the time I will use it in rear-discharge mode.

Here is a picture of how I used a wire clothes hanger to make the Black and Decker discharge out the back when I don't want to use the collection bag:

Make the Black and Decker a rear-discharge instead of bagging
How to Avoid Using the Collection Bag


A pleasant surprise about the cordless electric mower is how quiet it is.  I can mow comfortably without ear plugs or hearing protection.  It is quieter than a vacuum cleaner, and there are no fumes.  Plus, it is so light that it is easy to move around the yard with it.

I will say, however, that if you are expecting a cordless electric mower to be just like a gas mower then you are likely to be disappointed.  This mower is ideal for light mowing:  fairly short grass, fairly even terrain.  You won't be hacking through thick, overgrown weeds with a cordless electric mower.  That's OK, because that isn't how I use my push mower.

Another potential downside- it looks like a toy.  Black and Decker tried to style it up nice and sporty.  It was a nice try, but the small plastic push mower does look like a child's toy.  This doesn't bother me, but it may bother some people.

This mower comes with two 40V battery packs with 2 amp-hour capacity.  I like that there are 2 batteries included so you can always have a fully charged backup battery ready to go.  These high capacity batteries also work with other Black and Decker tools.  If the mower keeps working well, I will think about getting a cordless electric trimmer too.

Since the cordless mower already came with 2 batteries, I could buy the "bare tool" cordless hedge trimmer for around $50.  You can also get a cordless string trimmer and even a battery-powered snow blower and a battery-powered chain saw that use the same batteries and charger.


Overall, I think an electric mower will last a long time due to fewer mechanical parts to wear out, and it should require no maintenance other than sharpening the blade.  In the long run, I think I will come out ahead by upgrading to a cordless electric mower.


Copyright © 2017 by Dr. Penny Pincher.  All Rights Reserved.  Privacy Policy


Recent Penny Pincher Posts